Getting started with eSSENTIAL Accessibility™
What is eSSENTIAL Accessibility™ ?
eSSENTIAL Accessibility™ ™ is an innovative assistive technology. It helps people with a physical disability access websites more easily.
Since releasing our previous version of eSSENTIAL Accessibility™, we have made the interface much simpler and enhanced the features our users rely upon.
eSSENTIAL Accessibility™ : A quick overview
eSSENTIAL Accessibility™ makes your browsing experience a more accessible one by providing the following tools:
- Onscreen keyboard
- Mouse alternatives
- Text and image zooming
- Visual “click assist”
- Text-to-speech
- Voice recognition
About this manual
- Where applicable, this manual contains voice commands you can use to do certain things, like opening a dialog or clicking the mouse, within eSSENTIAL Accessibility™. Look for speech bubbles in the sidebar to the left for voice commands. To enable voice commands, refer to Enabling voice commands on page 6.
- While eSSENTIAL Accessibility™ works with older versions of Microsoft Windows, all instructions and images presented here presume the use of Windows 8.
- Your copy of eSSENTIAL Accessibility™ will be updated from the version used to create this manual, so certain images and instructions may vary slightly from how eSSENTIAL Accessibility™ works on your computer. If you have any questions or comments, please email them to support@essentialaccessibility.com.

How to install eSSENTIAL Accessibility™
eSSENTIAL Accessibility™ is a distinct piece of software on your computer. To prepare your computer to use eSSENTIAL Accessibility™ , follow these steps.
- In a web browser, visit www.essentialaccessibility.com/download-app/. The web page appears.You can also start the installation process by clicking the eSSENTIAL Accessibility™ logo on any website that features it
- Click the Download link. The Download page appears.
- Click the Download Now graphic.
- A File Download – Security Warning dialog may appear. If so, click the Run button.
- Follow the remaining on-screen instructions to complete the installation.
System requirements
eSSENTIAL Accessibility™ can be installed on any computer that meets the following minimum requirements:
- Microsoft Windows® 10, Windows® 8, Windows® 7 (Windows 10 or 8 recommended), 32bits or 64bits
- Hardware able to run decently with the Windows version:1GHz processor, 1GB of RAM, DirectX9 graphic cards
- 1280x720 display resolution, 1920x1080 recommended
- 40 MB free space on hard drive
- An internet connection
How to start eSSENTIAL Accessibility™
From the Windows 8 start screen, click the eSSENTIAL Accessibility™ tile.
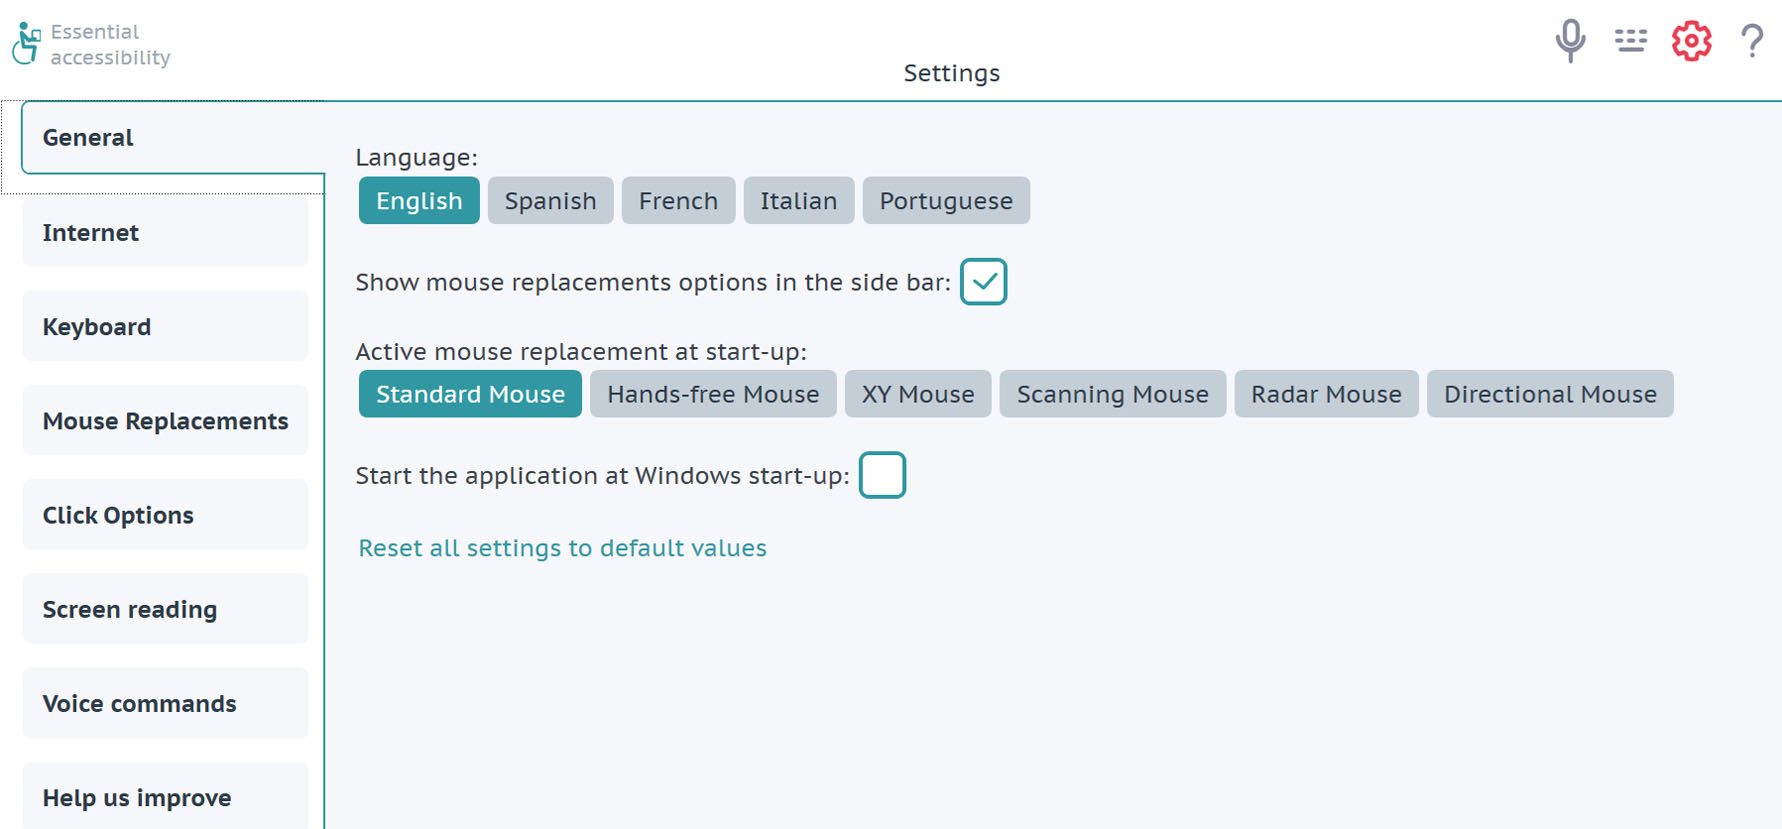
To start eSSENTIAL Accessibility™ at Windows start-up, click the Settings icon.

In the Settings screen, click General in the list on the left side of the screen, then check Start the application at Windows start-up check box
How to change language of eSSENTIAL Accessibility™
To change Language, click the Settings icon.
In the Settings screen, click General in the list on the left side of the screen, then choose your preferred language.
How to Reset all settings to default values
To change Reset all settings to default values, click the Settings icon.
In the Settings screen, click General in the list on the left side of the
screen, then click on
Reset all settings to default values
How to access online help
To check online help within eSSENTIAL Accessibility™, click the Help icon.
You can also access help from the Settings screen.

How to exit eSSENTIAL Accessibility™
To shut down eSSENTIAL Accessibility™, click the Exit application icon in the top
right
corner of the window.


Using alternatives to the keyboard and mouse
eSSENTIAL Accessibility™ does not require people to use standard computer keyboards
and mice to browse the web. Use your favourite option – keyboard only, mouse only,
even your voice – to navigate web pages.
Enabling keyboard and mouse alternatives
To make eSSENTIAL Accessibility™ ’s keyboard and mouse alternatives available while you
browse, click the Settings icon to enable them.
To close the Settings screen and return to the web page currently displayed, click the
Settings icon again.


Enabling the on-screen keyboard
To change Reset all settings to default values, click the Settings icon.
In the Settings screen, click General in the list on the left side of the screen, then click on Reset all settings to default values
How to access online help
To check online help within eSSENTIAL Accessibility™, click the Help icon.
You can also access help from the Settings screen.
How to exit eSSENTIAL Accessibility™
To shut down eSSENTIAL Accessibility™, click the Exit application icon in the top right corner of the window.
Using alternatives to the keyboard and mouse
eSSENTIAL Accessibility™ does not require people to use standard computer keyboards and mice to browse the web. Use your favourite option – keyboard only, mouse only, even your voice – to navigate web pages.
To make eSSENTIAL Accessibility™ ’s keyboard and mouse alternatives available while you browse, click the Settings icon to enable them.
To close the Settings screen and return to the web page currently displayed, click the Settings icon again.
In the Settings screen, click Keyboard in the list on the left side of the screen, then click the Auto-open keyboard check box.
Enabling your favourite on-screen mouse replacement
In the Settings screen, click General in the list on the left side of the screen, then choose your preferred mouse replacement in the Activate mouse replacement at start-up option.

This setting merely tells eSSENTIAL Accessibility™ what choice to enable when you first start to browse. You can switch to different mouse replacements as you browse.
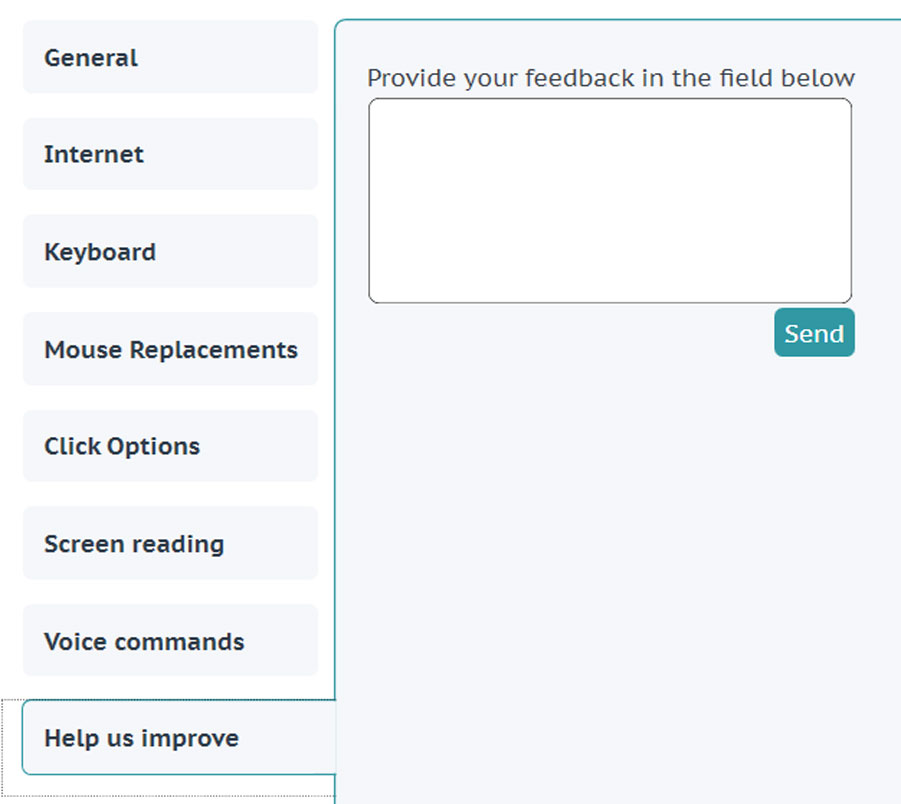
Enabling voice commands
In the Settings screen, click Voice Commands in the list on the left side of the screen, and finally, click the Enable voice commands check box.
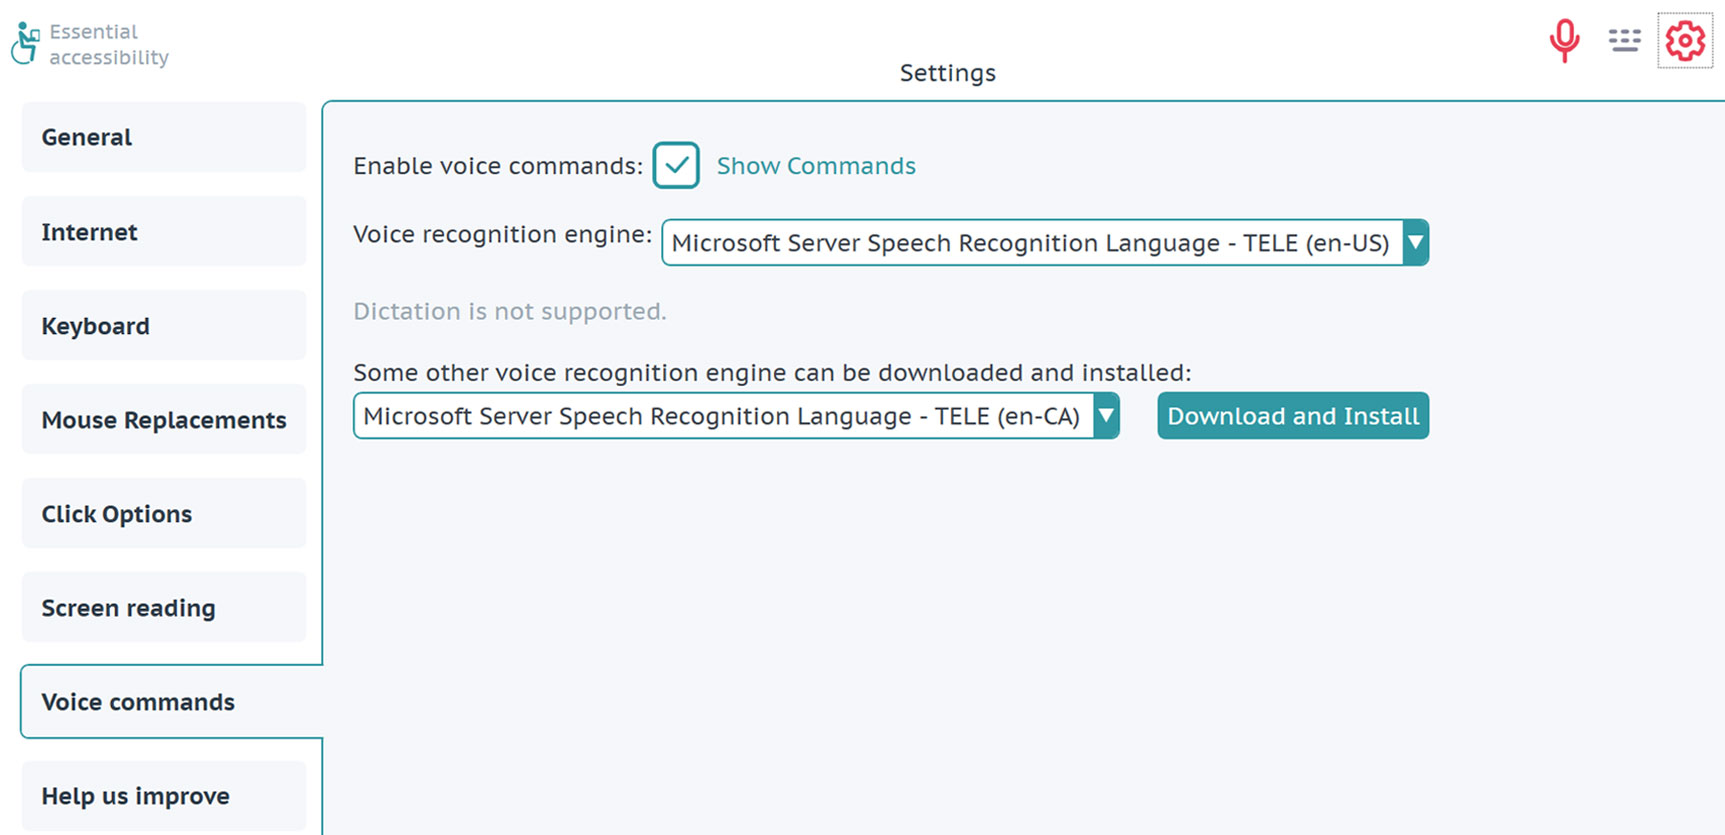
You can also enable voice commands by clicking the Voice commands icon at the top of the eSSENTIAL Accessibility™ window.

In this screen, you can also set the voice recognition engine you’d prefer to use. Many computers will only have the default one from Microsoft, but some people may use another engine from another company. If your computer has no voice recognition engine, this feature is unavailable.
Using the mouse to enter text
Instead of using a physical keyboard to enter text in a web page, you might prefer to use your mouse instead. To do so, follow these steps.
- Click a text field. Text fields are places where you can enter text. Common examples include the browser address bar or the search field on google.com.
-
The on-screen keyboard may appear once you click the text field. If it doesn’t, click the on-screen keyboard icon in the top right corner of the eSSENTIAL Accessibility™ window.

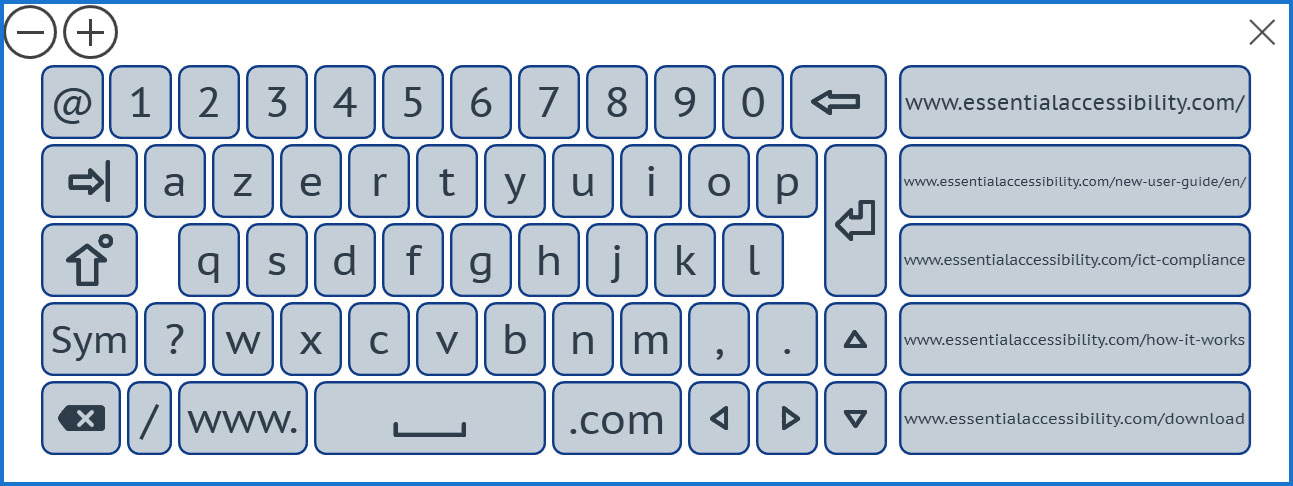
The on-screen keyboard appears.
-
Type the text you want to enter.
Note the convenience of keys labeled “www.” and “.com” in the on-screen keyboard that you can use to reduce the number of mouse clicks you need to make. - To hide the on-screen keyboard, click the keyboard icon again.
Alternative methods of controlling your mouse
eSSENTIAL Accessibility™ offers several alternatives to using a mouse to control the mouse pointer in your browser. Each method is designed to ease moving or clicking the mouse, or both in certain cases.
eSSENTIAL Accessibility™ groups the mouse alternatives in the left side of the window.

To show or hide side bar with mouse replacements options, click the Settings icon.
In the Settings screen, click General in the list on the left side of the screen, then click on Show mouse replacements options in the side bar check box.
You will find explanations of each mouse alternative in this section.
Hands-free mouse
You can control your mouse by moving your head or your hand in full view of your computer’s front-facing camera, commonly referred to as a webcam. To use the hands-free mouse, follow these steps.
-
Click the Settings icon.
The Settings screen appears.
- In the Settings screen, click Mouse Replacements in the list on the left side of the
screen, then Hands-free Mouse.
Settings for the hands-free mouse appear
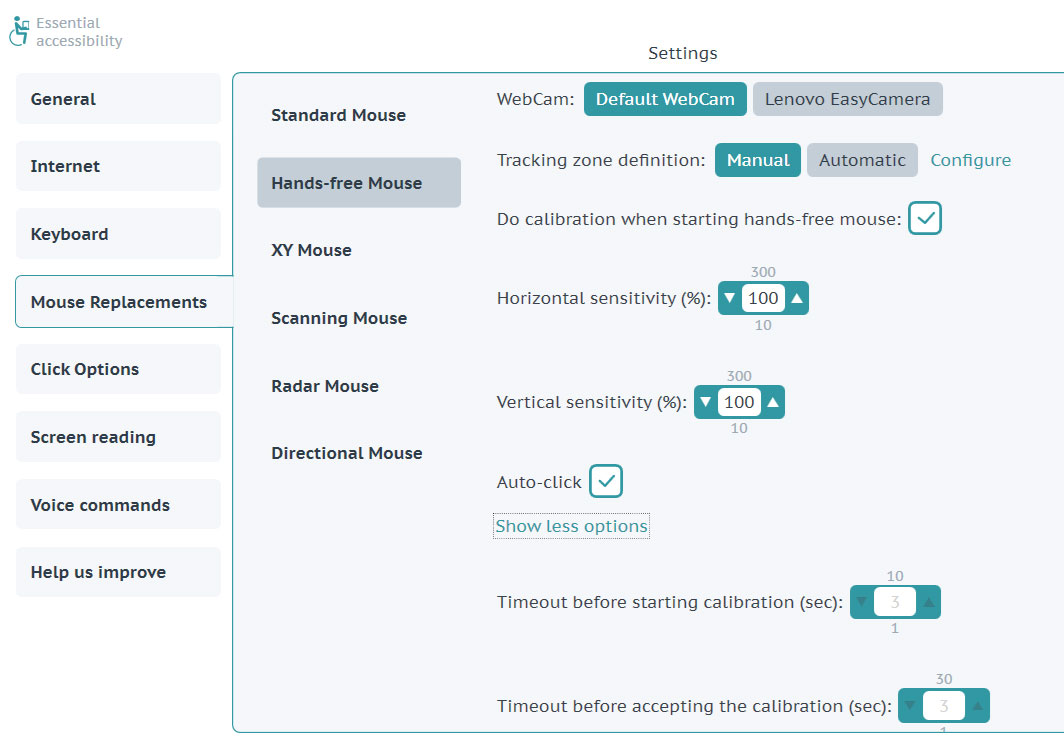
In this screen, choose the appropriate WebCam to use (most computers only have one).
Set Tracking zone definition how the application will define tracking zone (manual or automatic).
Set Do calibration every time when starting hands-free mouse to the appropriate value
Choose time before starting the calibration and before accepting the calibration
You can also choose how quickly the mouse pointer reacts to your movements using the Horizontal sensitivity (%) and Vertical sensitivity (%) settings.
You can choose between two Auto-click options:
- the mouse can click either when it hovers over an area (Auto-click check box is checked) or
- when it’s physically clicked (StandardClick, Auto-click check box is unchecked).
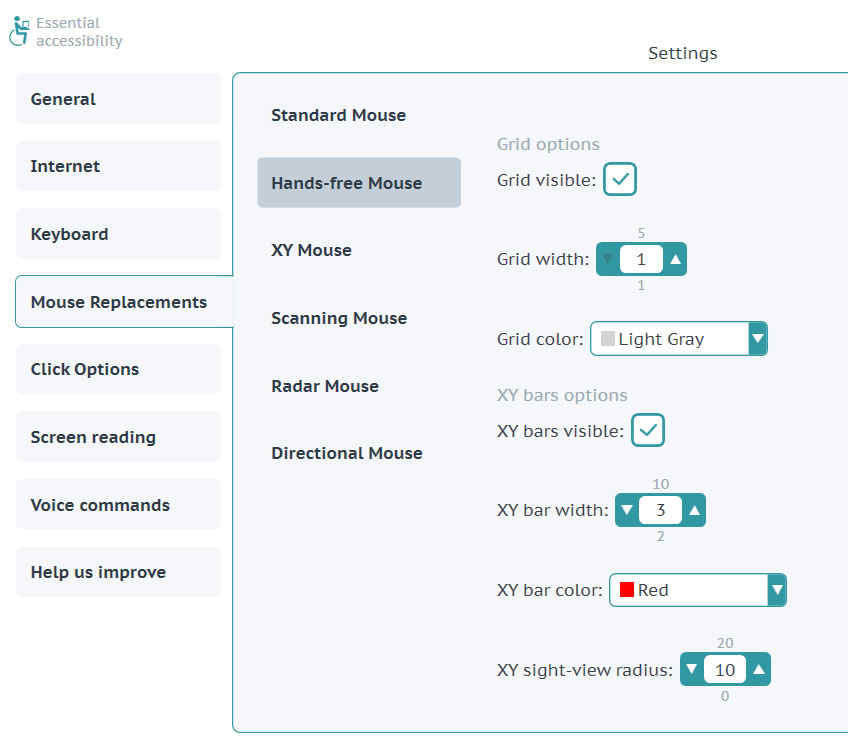
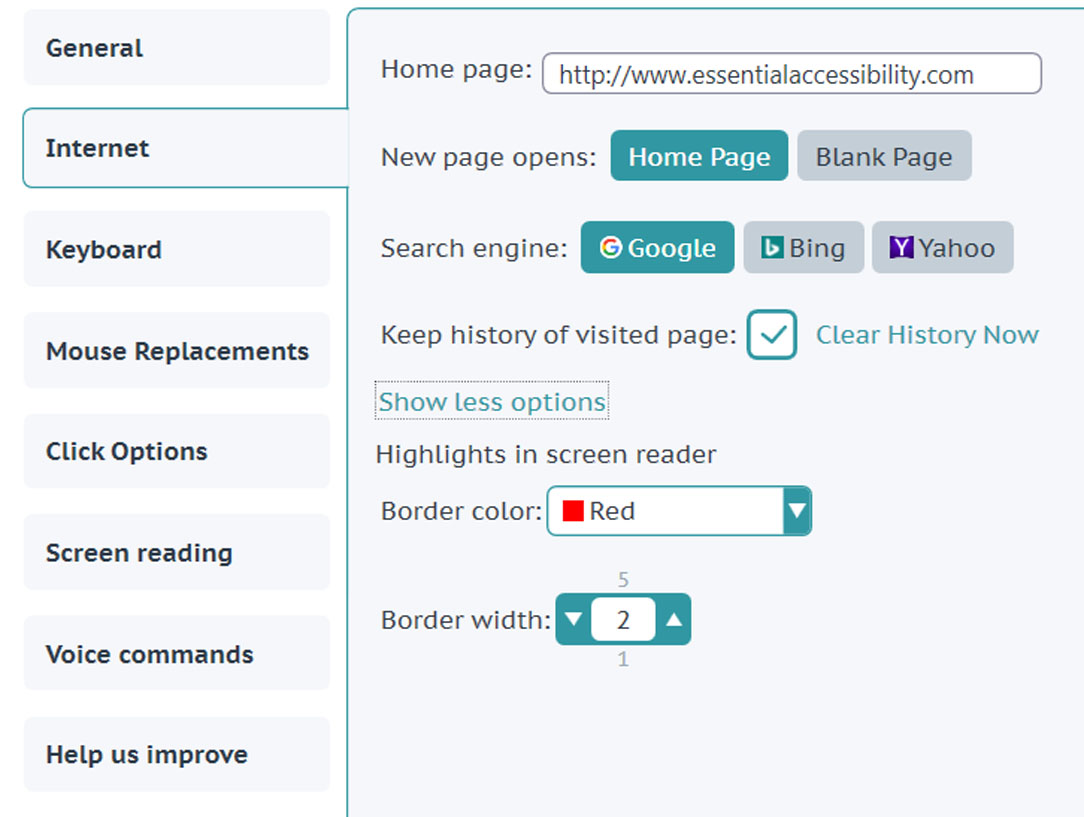
In this screen, you can also determine the appearance of the XY bars and appearance of the Grid.
To show XY bars check XY bars visible check box.
Make the bars easier to see by increasing the Bar width.
To change the size of the circle that moves across the mouse pointer, change the Sight-view Radius number. The larger the number, the larger the circle.
Set the Bar color to one that you can easily see.
To show grid check Grid visible check box
Make the grid easier to see by increasing the Grid width. Set the Grid color to one that you can easily see.
-
Click the Hands-free mouse icon in the left side of the eSSENTIAL Accessibility™ window. The eSSENTIAL Accessibility™ logo in the centre of the top of the window changes into a small video screen to show you what your webcam sees.
You can use this and other mouse replacements in the Settings screen or on web pages.

- Move your face or a finger in front of the webcam to manipulate the mouse pointer.
-
To click an area of the page, hover the mouse pointer over that area.

-
To return to the standard mouse, click the Start Standard Mouse icon in the left side of the eSSENTIAL Accessibility™ window.
You can also hold down the Ctrl key and press F1 to return to the standard mouse.


When you use an alternative to the standard mouse and Auto-click is enabled, eSSENTIAL Accessibility™ adds the icons in the left side of the window with the Pause Autoclick and Drag and Drop icon
XY mouse
Every point on a web page sits at a certain latitude and longitude, much like a point on a map. You could call the precise spot an “XY” coordinate, much as would be found on a two-dimensional graph like the one on the right:
eSSENTIAL Accessibility™ can navigate to each spot on a map by first moving to the correct latitude and then the correct longitude. In this example, eSSENTIAL Accessibility™ started by moving a horizontal line down from the top of the page. Once the mouse was clicked, the horizontal line stopped where it was and a vertical line started to move from the left side of the page to the right.
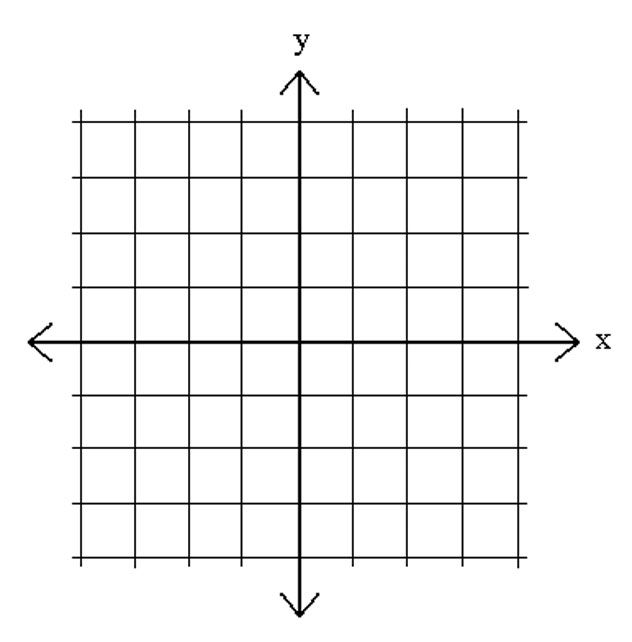
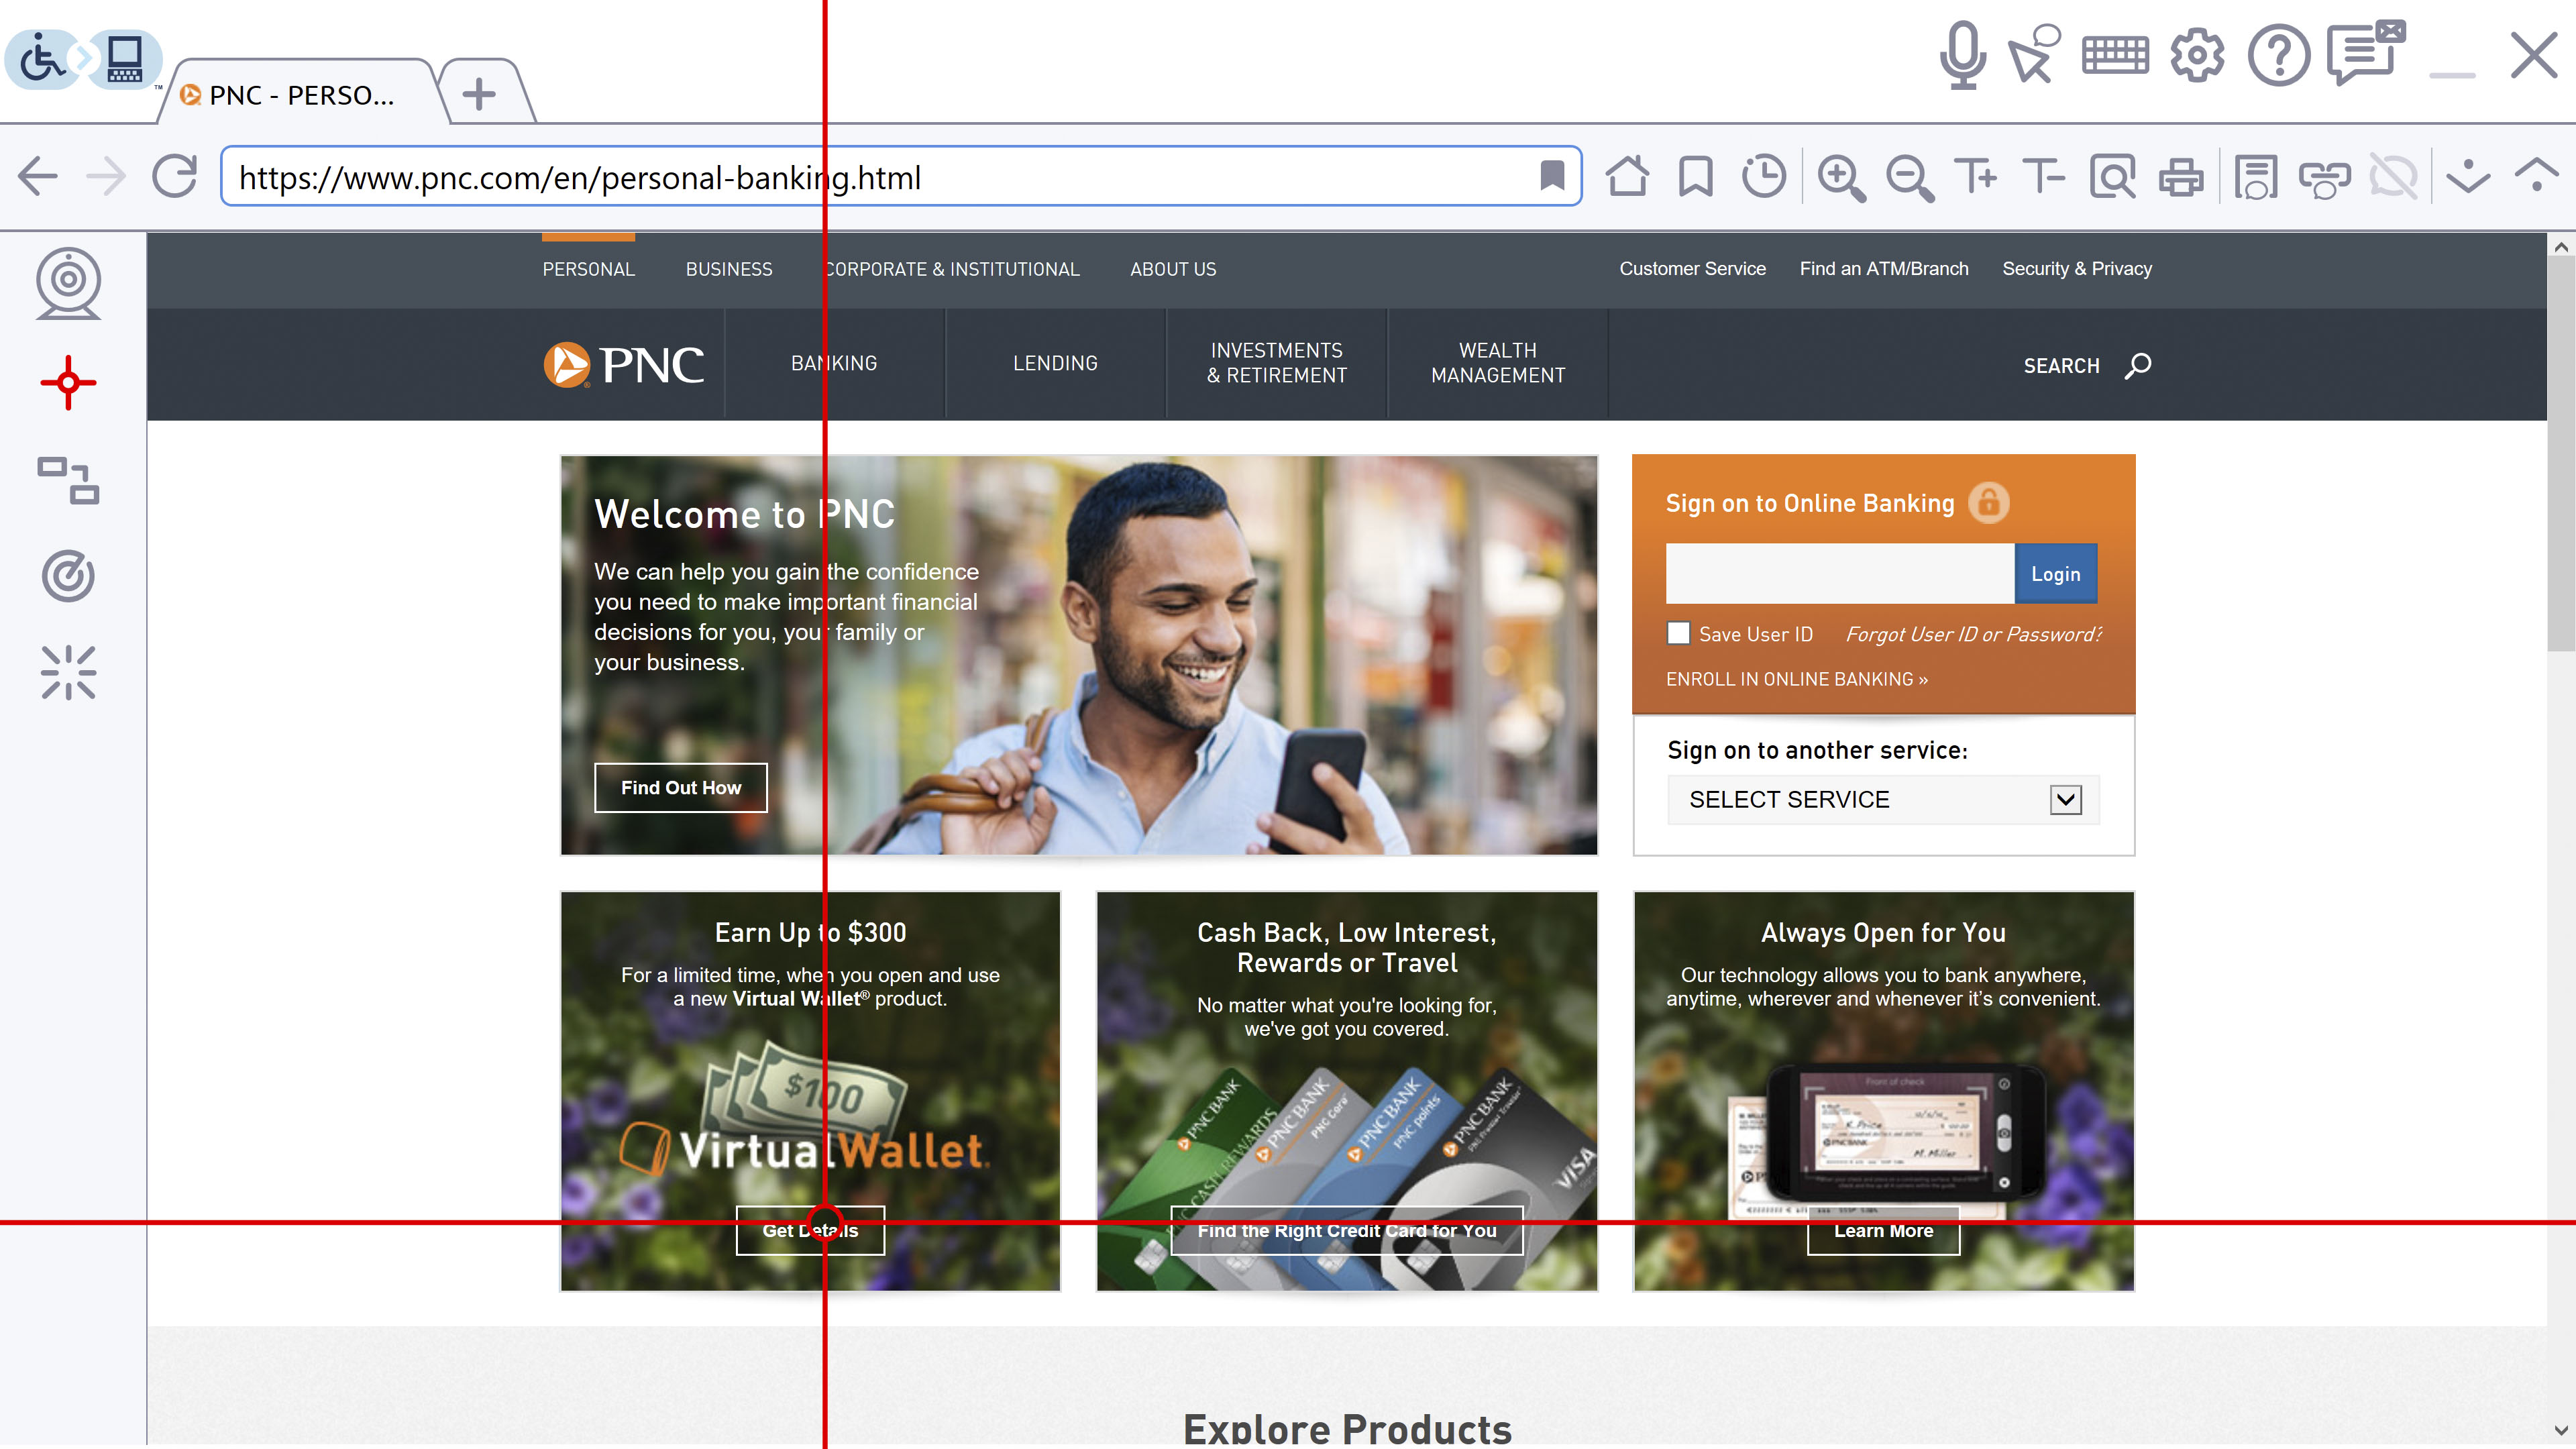
By clicking at the precise spot where the red circle indicates the intersection of the two lines, the user clicks the “Get Details” button.
To use the XY mouse, follow these steps.
-
Click the Settings icon.
The Settings screen appears.
-
In the Settings screen, click Mouse Replacements in the list on the left side
of the screen, then XY Mouse.
Settings for the XY mouse appear.
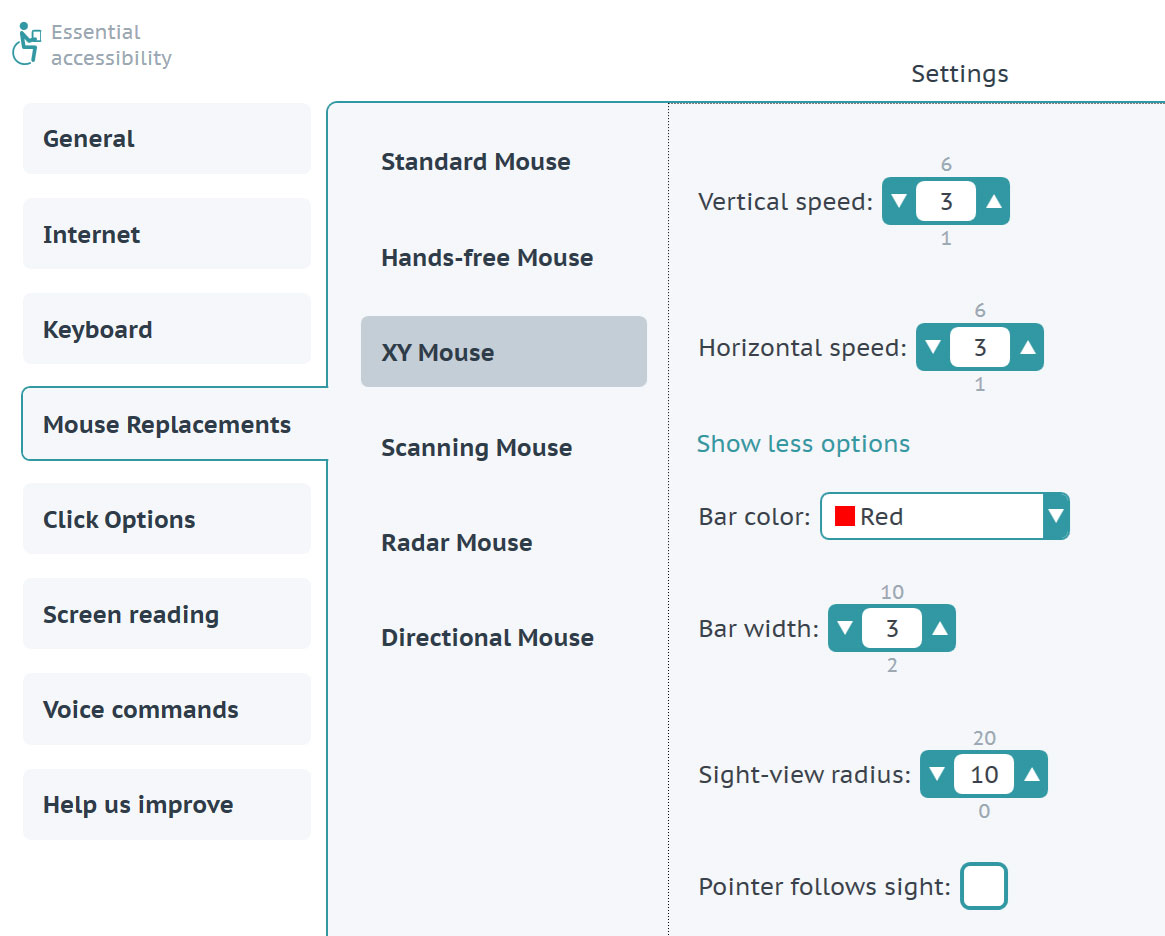
In this screen, you can determine the appearance and movement of the XY mouse.
Make the bars easier to see by increasing the Bar width.
To change the size of the circle that moves across the horizontal sweep line, change the Sight-view Radius number. The larger the number, the larger the circle.
Set the Bar color to one that you can easily see.
Pointer follows sight lets the XY mouse hold open a menu on a web site, allowing the user to click an option under the menu.
Speed up or slow down the bars by changing either the Vertical speed, the Horizontal speed, or both.
Warning: if you choose settings that are too high (i.e. too fast) you may not be able to control the mouse pointer effectively. Should that happen, hold the Ctrl key on your keyboard and press F1 to return to the standard mouse, then change the XY mouse speed settings to have it move slower.
-
Click the XY mouse icon in the left side of the eSSENTIAL Accessibility™ window.
You can use this and other mouse replacements in the Settings screen or on web pages.


- To start the XY mouse moving down the screen, click your mouse.
- To stop the downward movement and start the XY mouse moving from left to right, click your mouse again.
- Once the red circle reaches the spot you want to click, click your mouse.
-
To return to the standard mouse, click again the XY mouse icon in the left side of the main window.
You can also hold down the Ctrl key and press F1 to return to the standard mouse.

Scanning mouse
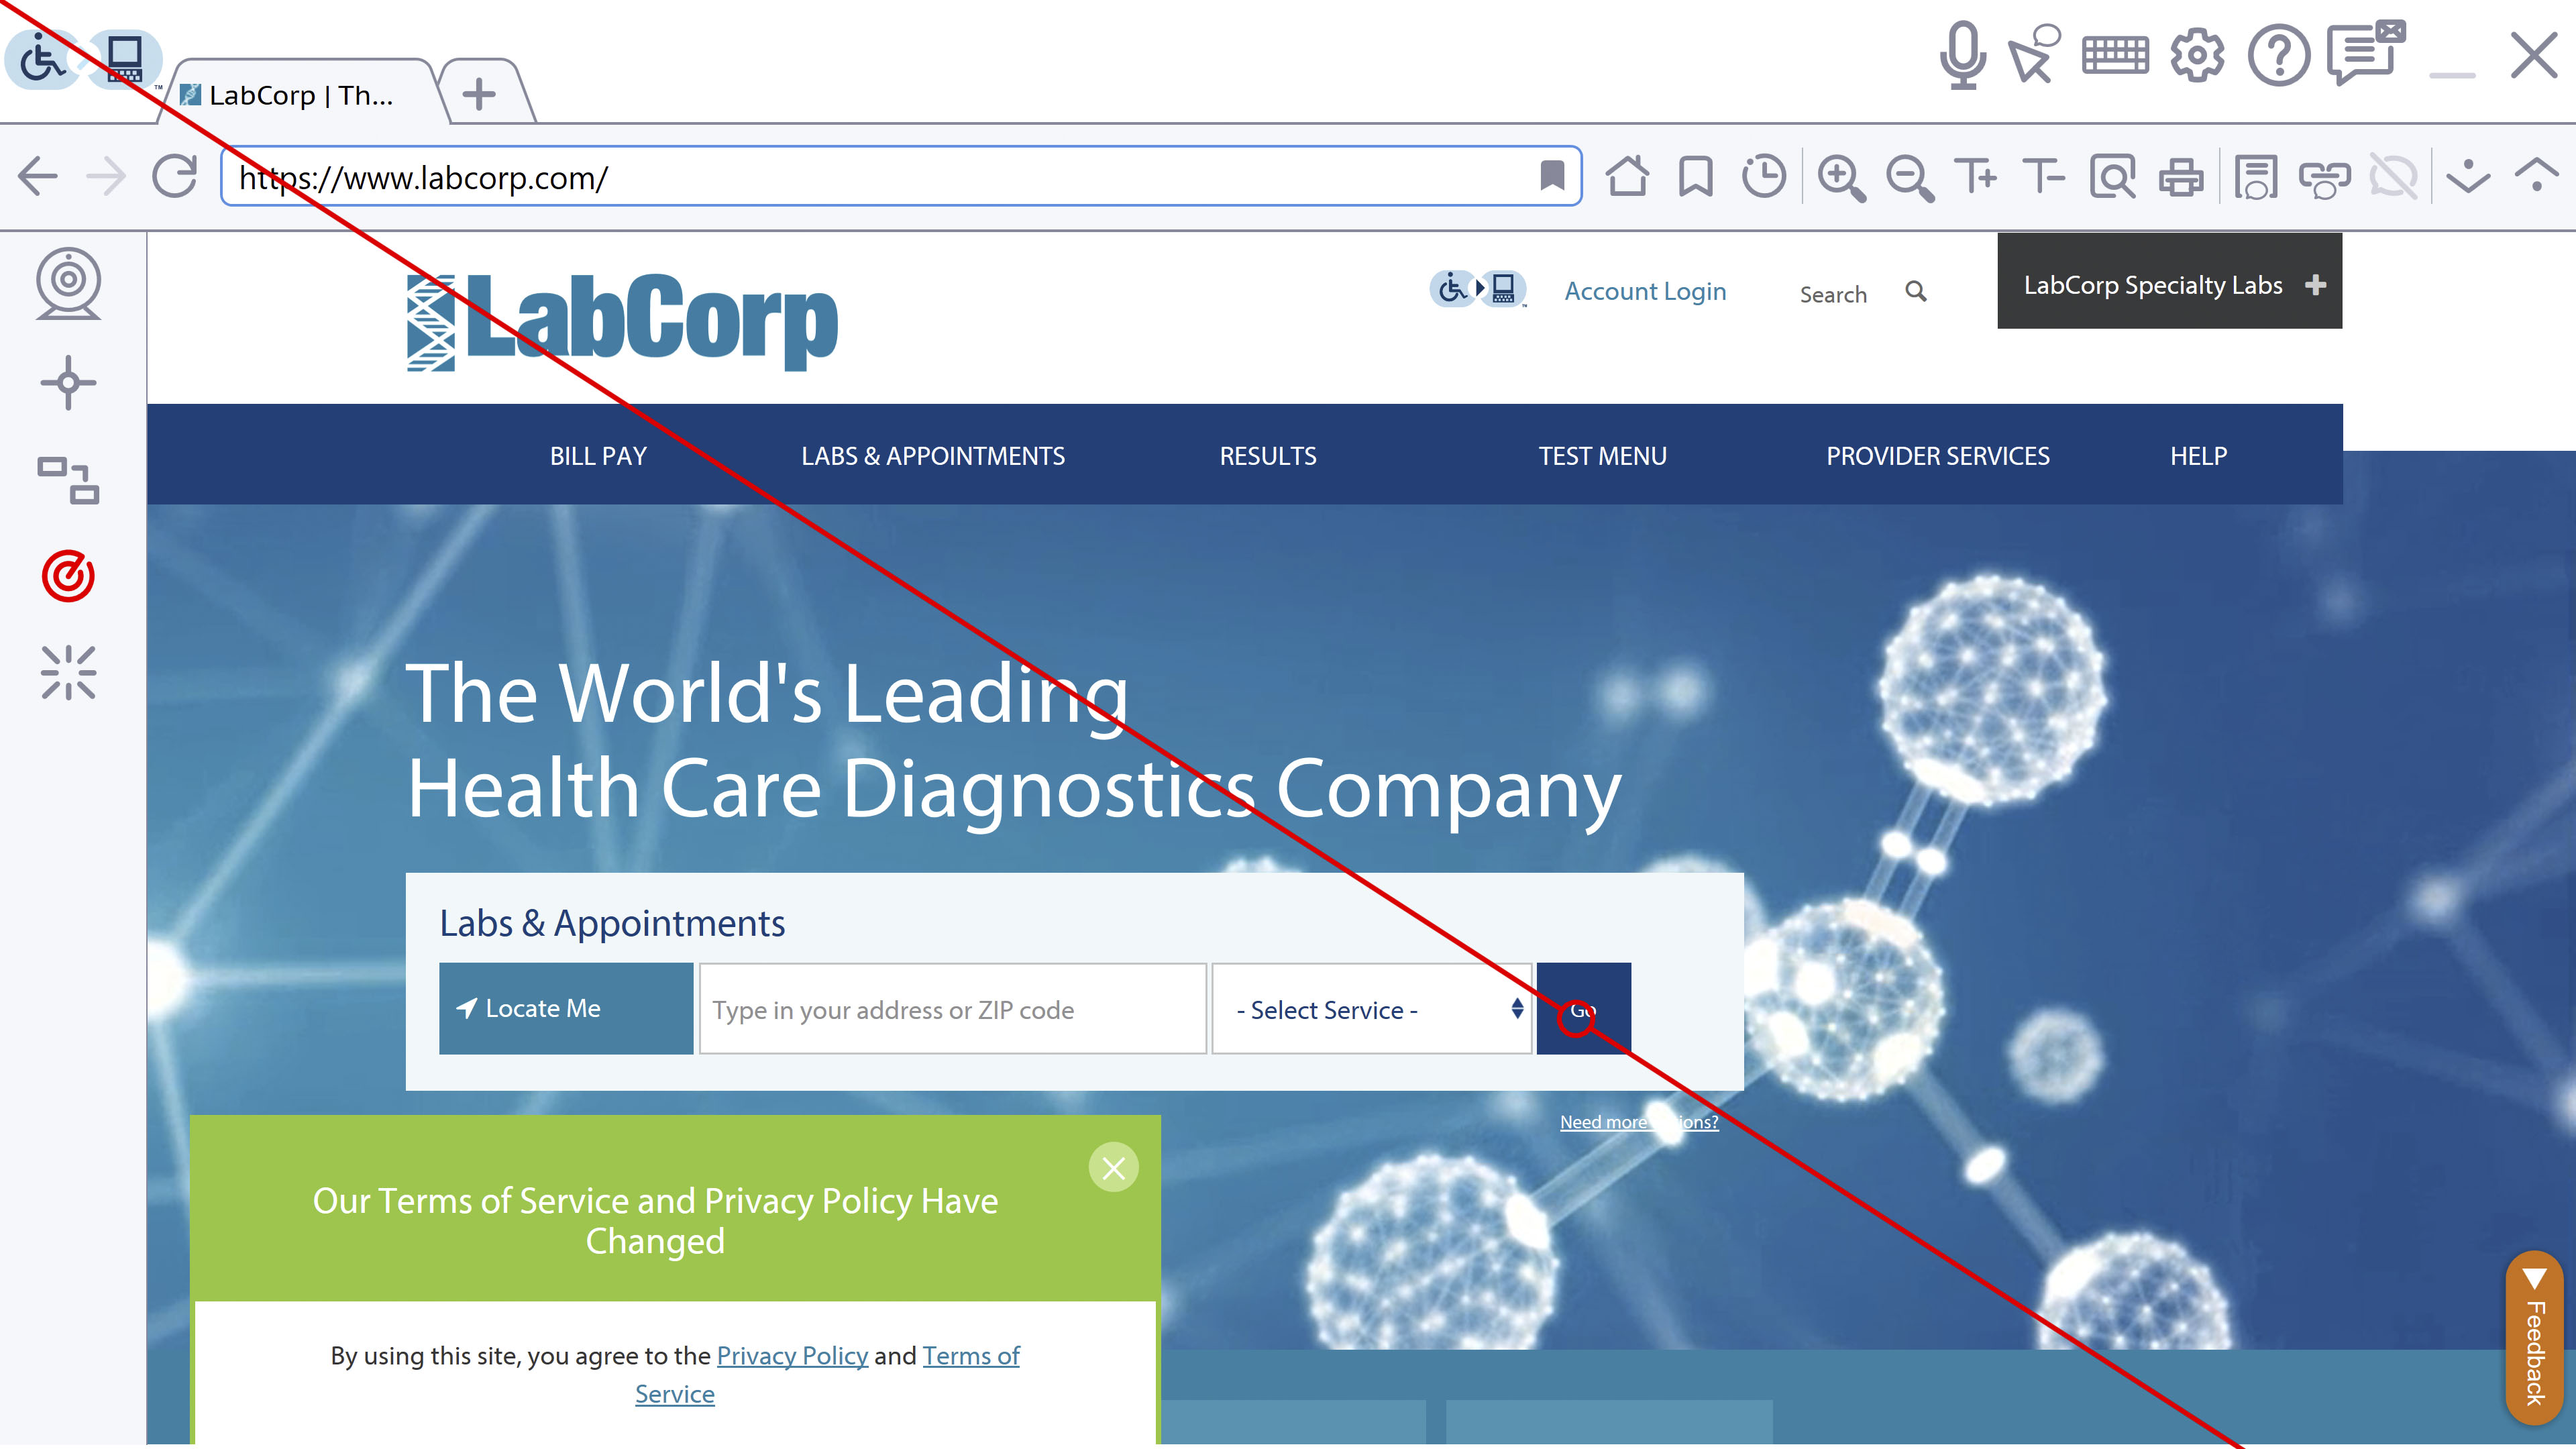
Web pages contain a number of distinct objects, things like fields, frames and links. eSSENTIAL Accessibility™ can highlight each one of these objects, moving from one to the next automatically. It can also allow you to control when the “highlight” moves from one object to the next. Once the object you want is highlighted, click your mouse. In this example, the user wants to click the The coalition link. First, the user has to right-click until the web page, which contains the The coalition link, is contained by a red border. See the image below for an example.

At this point, the user left-clicks once to make the mouse scan clickable objects in the web page.
Then the user right-clicks the mouse until the The coalition link is contained by a red border, as it is in the image below. To activate it, the user left-clicks the mouse.

To use the scanning mouse, follow these steps:
-
Click the Settings icon.
The Settings screen appears.
- In the Settings screen, click Mouse Replacements in the list on the left
side of the
screen, then Scanning Mouse.
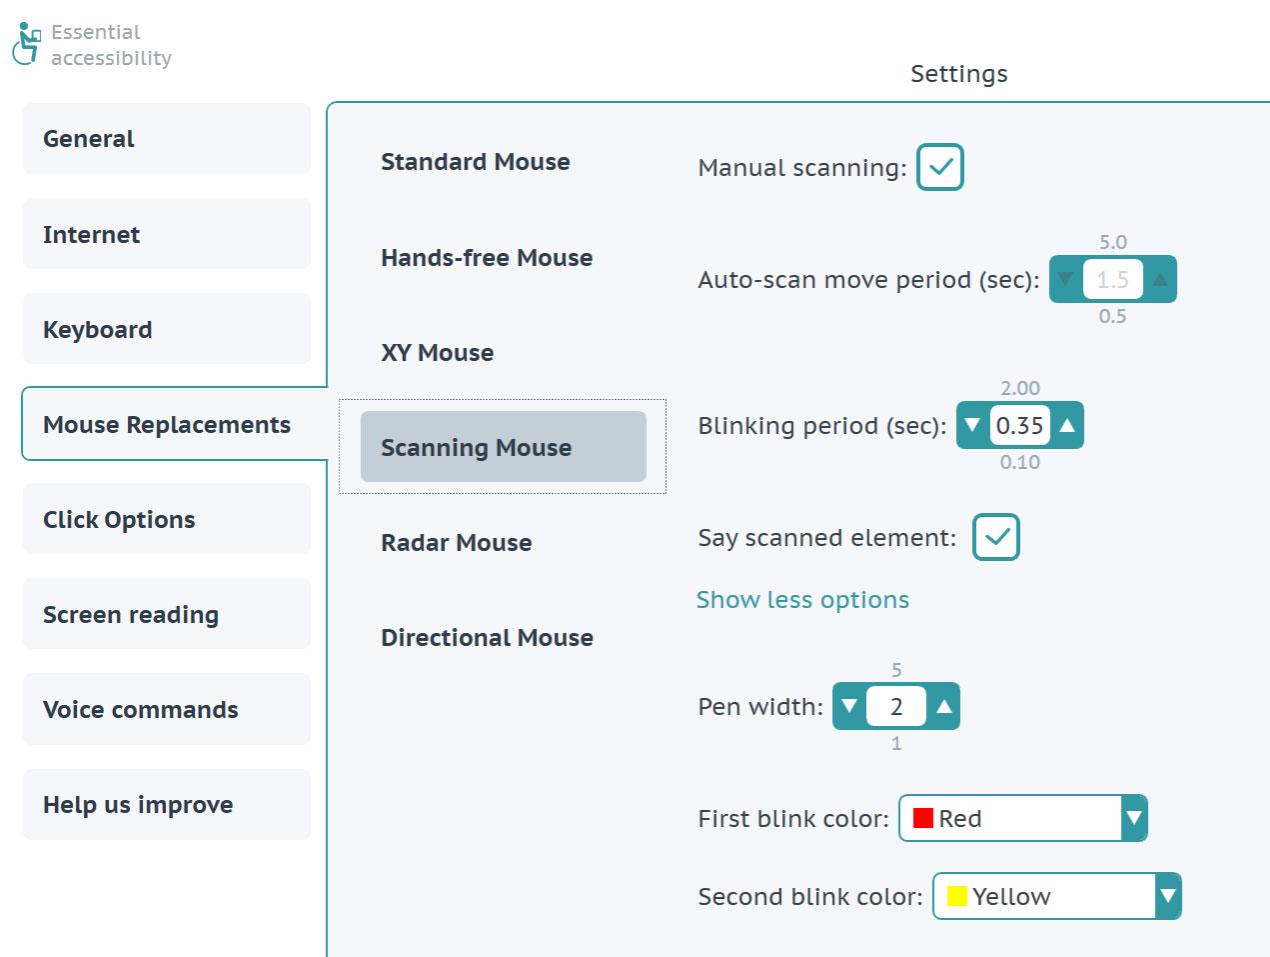
Settings for the scanning mouse appear.
In this screen, you can determine the appearance and movement of the scanning mouse.
If you do not choose Manual Scanning, set the Auto-scan move period (sec) to determine how many seconds the scanning mouse stays on one object before moving to the next.
If you choose Manual Scanning, the Auto-scan move period (sec) setting is not available, since it does not apply.
You can make the scanning mouse blink more frequently by lowering the Blinking period (sec) number.
If you want the computer to audibly speak the text for the link, select the Say scanned element check box.
To change the width of the lines that comprise the “link container” change the Pen width number.
To change the color of the “container field” first blink, change the First blink color setting.
To change the color of the “container field” second blink, change the Second blink color setting.
-
Click the Scanning mouse icon in the left edge of the eSSENTIAL Accessibility™ window.You can use this and other mouse replacements in the Settings screen or on web pages.


-
To start the scanning mouse moving to major areas of the screen, right-click your mouse. The scanning mouse jumps quickly between the following major areas of the browser:
- top toolbar
- address bar
- tab bar
- web page
- left toolbar
-
Once the major area of the screen you want to interact with is highlighted, left-click your mouse.
The highlight jumps to the first clickable object in that area.
- Right-click your mouse to move from link to link.
- Once the highlight reaches the link you want to click, left-click your mouse.
-
To return to the standard mouse, click again the Scanningmouse icon in the left side of the main window.
You can also hold down the Ctrl key and press F1 to return to the standard mouse.
Radar mouse
This mouse alternative “sweeps” the eSSENTIAL Accessibility™ window much like the line on an airport radar screen.
Airport radar displays typically “anchor” their lines in the center of the screen. eSSENTIAL Accessibility™ ’s radar mouse offers that option, as well as that of anchoring the line at the top left corner of the screen, as shown here:
To use the radar mouse, follow these steps:
-
Click the Settings icon.
The Settings screen appears.
- In the Settings screen, click Mouse Replacements in the list on the left side
of the screen, then Radar Mouse.
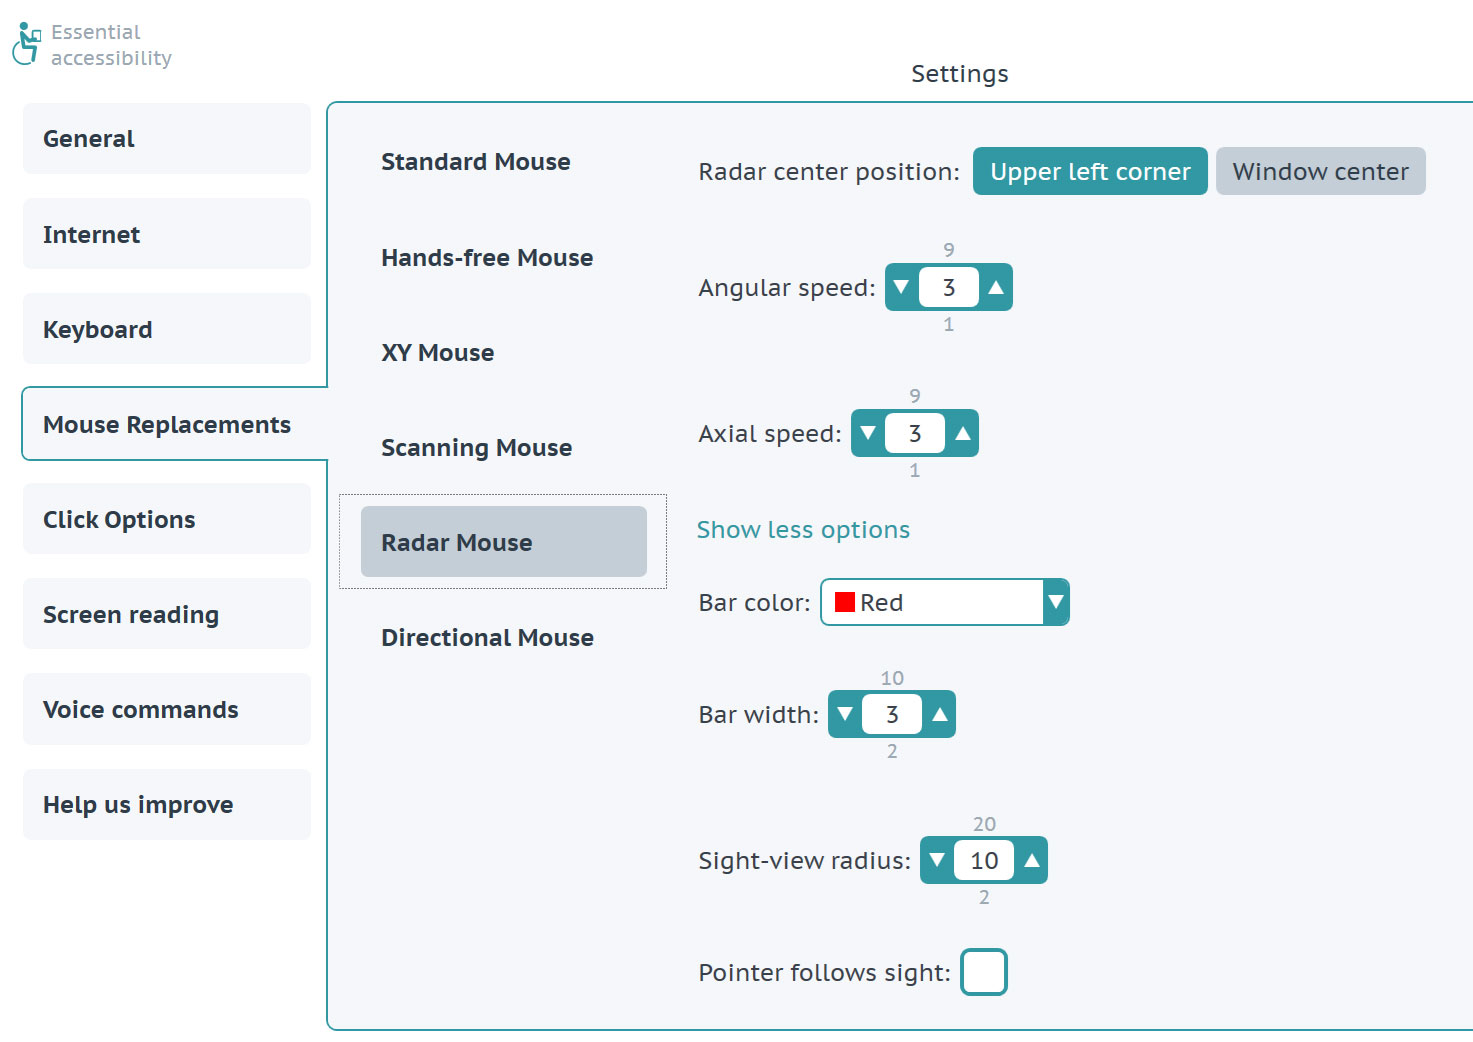
Settings for the radar mouse appear.
In this screen, you can determine the appearance and movement of the radar mouse.
If the mouse anchor is in the top left corner of the eSSENTIAL Accessibility™ window, you can make it move slower or faster using the Angular speed setting.
If the mouse anchor is in the center of the eSSENTIAL Accessibility™ window, you can make it move slower or faster using the Axial speed setting.
Warning: if you choose settings that are too high (i.e. too fast) you may not be able to control the mouse pointer effectively. Should that happen, hold the Ctrl key on your keyboard and press F1 to return to the standard mouse, then choose lower radar mouse speed settings.
To make the “sweep line” more visible, increase the number for the Bar width.
To change the size of the circle that moves along the radar sweep line, change the Sight-view Radius number. The larger the number, the larger the circle.
To change the “sweep line” to a different color, changes the Bar color.
Pointer follows sight lets the XY mouse hold open a menu on a web site, allowing the user to click an option under the menu.
Radar center position, determines whether the “radar” does:
- a full turn to cover the page, starting from the center of the screen
- a quarter-turn to cover the page, starting from the top left corner of the screen.
-
Click the Radar mouse icon in the left side of the eSSENTIAL Accessibility™ window. You can use this and other mouse replacements in the Settings screen or on web pages. The radar mouse starts sweeping the eSSENTIAL Accessibility™ window.


- Once the radar line crosses the object that you want to click, click the left mouse button. A small circle moves along the radar sweep line towards the object you want to click.
- Once the circle reaches that object, click the left mouse button again. The object is clicked and the radar mouse sweep line continues to move.
-
To return to the standard mouse, click the Start Standart Mouse icon in the left side of the eSSENTIAL Accessibility™ window.
You can also hold down the Ctrl key and press F1 to return to the standard mouse.

Directional mouse
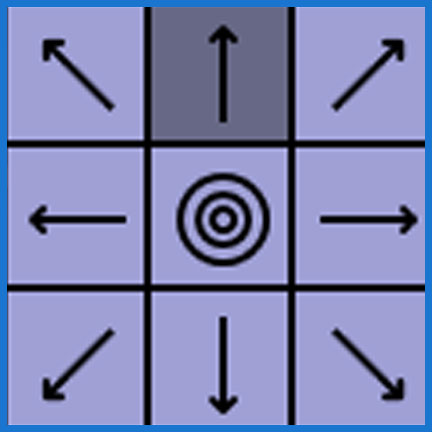
Using the directional mouse, you can move the mouse in one of eight directions and click it, all using only the left click button on your mouse.
When you choose the directional mouse, the graphic on the right appears in the bottom right corner of the page. .
eSSENTIAL Accessibility™ moves through the eight directions, represented by the arrows, and the centre “bullseye” click graphic, in sequence. If you click, for instance, when the top centre arrow is highlighted, the mouse pointer moves up until you click again.
eSSENTIAL Accessibility™ then highlights the other arrows and the bullseye, in sequence, until you click one of them to either move the mouse pointer or click what’s under the pointer.
To use the directional mouse, follow these steps.
-
Click the Settings icon.
The Settings screen appears.
- In the Settings screen, click Mouse Replacements in the list on the left side of
the screen, then Directional Mouse.
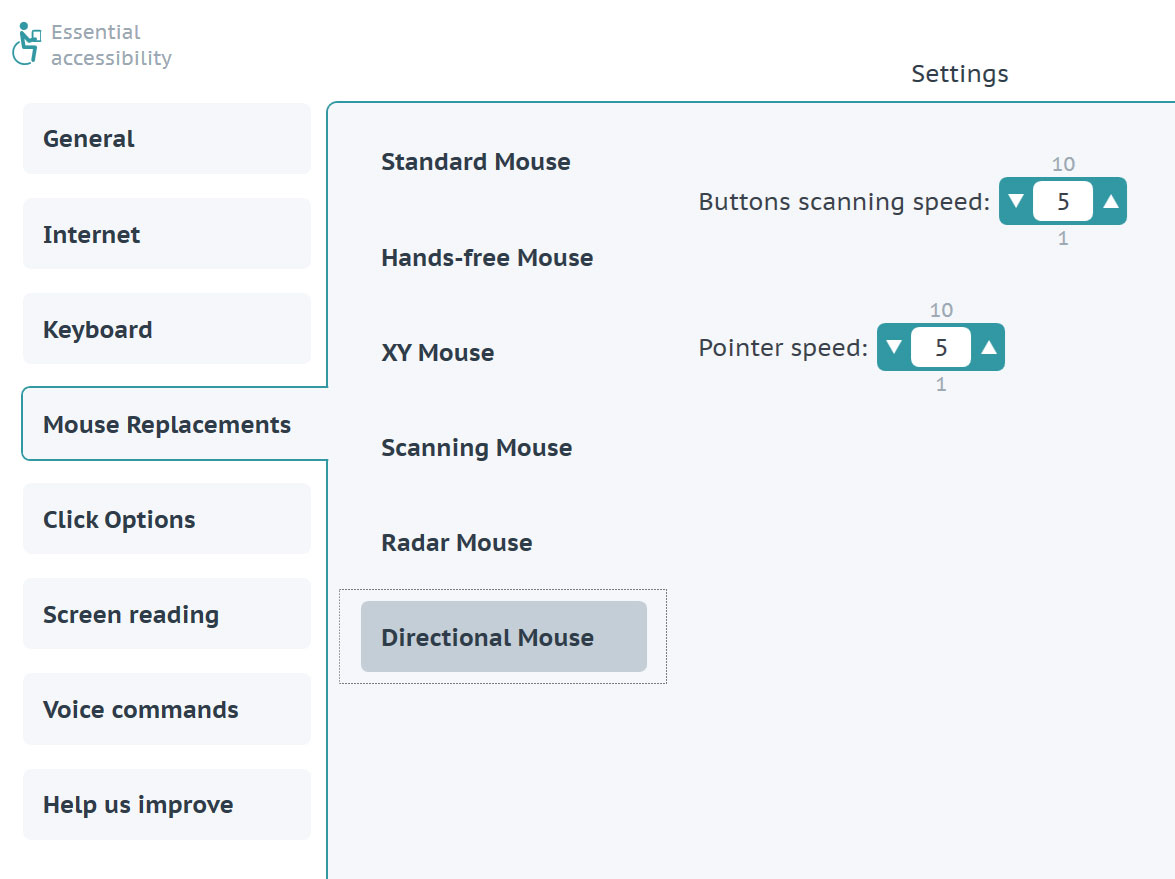
Settings for the directional mouse appear.
To switch more quickly (or slowly) between the nine directional mouse choices, increase (or decrease) the Buttons scanning speed number.
To make the mouse pointer move more quickly (or slowly) across the screen, increase (or decrease) the Pointer speed number.
Warning:if you choose settings that are too high (i.e. too fast) you may not be able to control the mouse pointer effectively. Should that happen, hold the Ctrl key on your keyboard and press F1 to return to the standard mouse, then change the directional mouse settings to slower speeds.
-
Click the Directional mouse icon in the left side of the eSSENTIAL Accessibility™ window.


You can use this and other mouse replacements in the Settings screen or on web pages. The directional mouse “eight-arrow” icon appears on screen.
-
To return to the standard mouse, click the Start Standart Mouse icon in the left side of the eSSENTIAL Accessibility™ window
You can also hold down the Ctrl key and press F1 to return to the standard mouse.
Standard mouse
You can have your mouse behave as it ordinarily does in other software using the standard mouse.
To use the standard mouse, follow these steps:
-
Click the Settings icon.
The Settings screen appears.
- In the Settings screen, click Mouse Replacements in the list on the left side of the
screen,
then Standard Mouse.
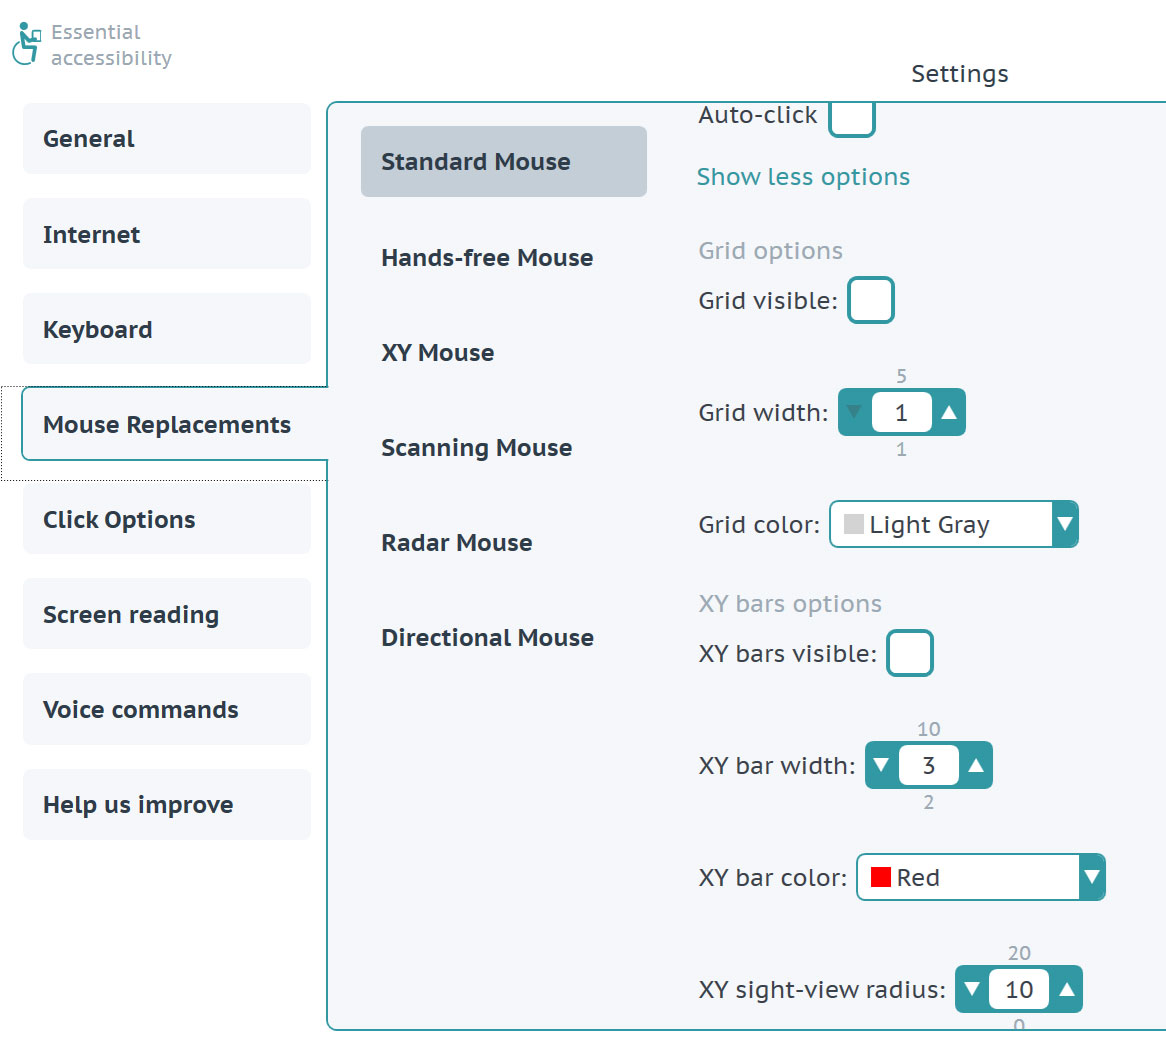
Settings for the standard mouse appear.
In this screen, you can choose between two Auto-click options: to physically click the mouse (uncheck the Auto-Click check box) or to have eSSENTIAL Accessibility™ click the mouse for you once you hover over a link (check the Auto-Click check box).
In this screen, you can also determine the appearance of the XY bars and appearance of the Grid.
To show XY bars check XY bars visible check box
Make the bars easier to see by increasing the Bar width.
To change the size of the circle that moves across the mouse pointer, change the Sight-view Radius number. The larger the number, the larger the circle.
Set the Bar color to one that you can easily see.
To grid check Grid visible check box
Make the grid easier to see by increasing the Grid width.
Set the Grid color to one that you can easily see.
Click options
Many of the mouse alternatives let users either:
- Many of the mouse alternatives let users either:
- have the mouse automatically click by hovering momentarily over a spot on the screen (Auto-Click)
To change the behaviour of either click, go to the eSSENTIAL Accessibility™ Settings screen by clicking this icon.
The Settings screen appears.
The Settings for click options appear
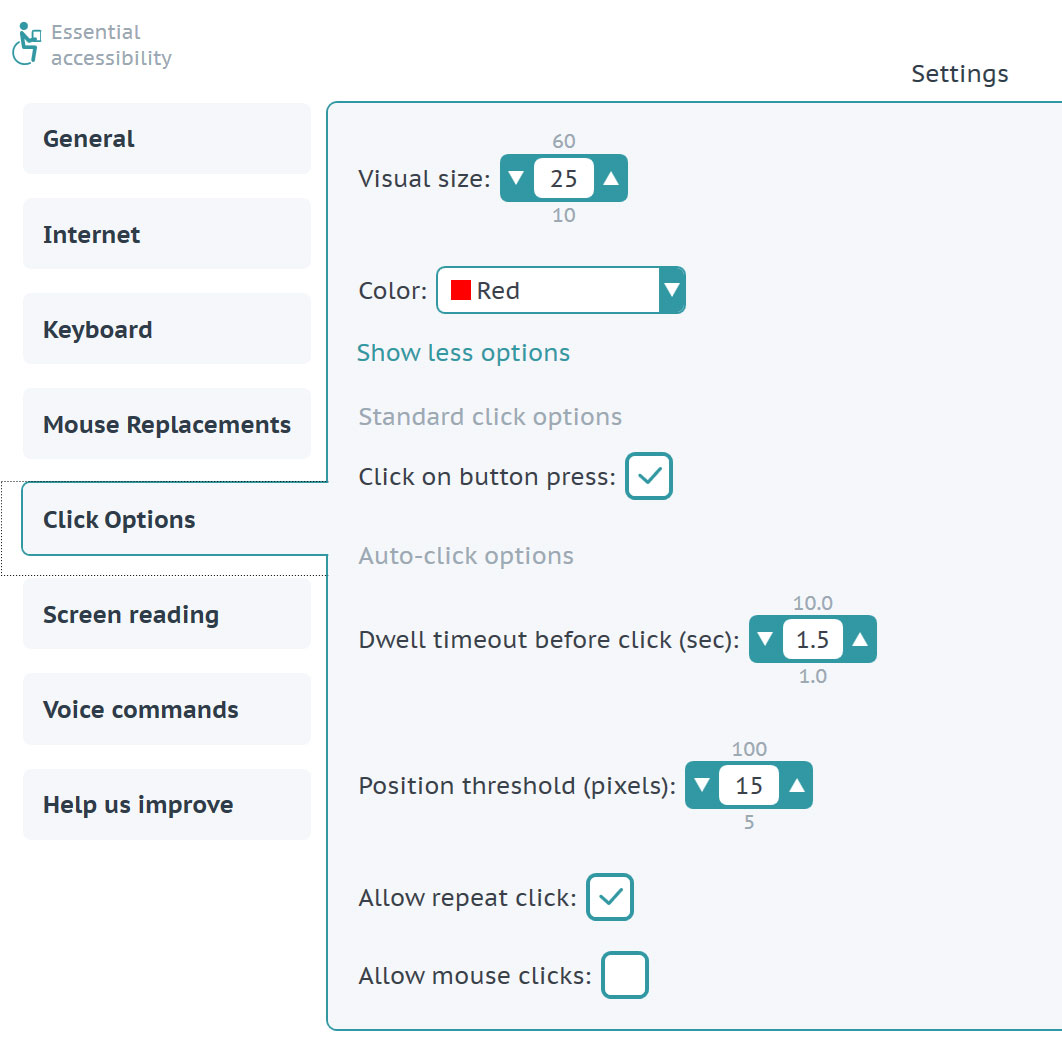
In the Settings screen, click Click Options in the list on the left side of the screen
If you want to prevent a mouse click when you physically click your mouse, deselect the Click on button press check box.
AutoClick is available for the Standard Mouse and the Hands-Free Mouse.
Use these settings to determine the behavior of AutoClick.
- Use Dwell timeout before click (sec) to set the length of time (in seconds) that you need to dwell over an area before a click occurs.
- Enable a click in the exact same place as your previous click by selecting the Allow repeat click check box.
- You can allow the cursor to hover near a clickable object on-screen while not keeping it perfectly still. The Position threshold (pixels) is the number of pixels the mouse pointer can move without eSSENTIAL Accessibility™ considering it a movement. If, for example, you define 10 pixels as a position threshold, auto-click will perform a click if you stop within a square of 20 x 20 pixels (10 pixels around the object you want to click) during the dwell timeout.
Making websites easier to see
eSSENTIAL Accessibility™ provides tools that can help you decipher text and images on a web page and how you interact with them.
Circling what you click
Each time you click your mouse on a web page, you can have eSSENTIAL Accessibility™ flash a circle at the precise spot where you click.
To engage this visual click effect, follow these steps:
-
Click the Settings icon.
The Settings screen appears.
- .In the Settings screen, click 'Click Options' in the list on the left side
of the screen,
then the Visual effect check box.
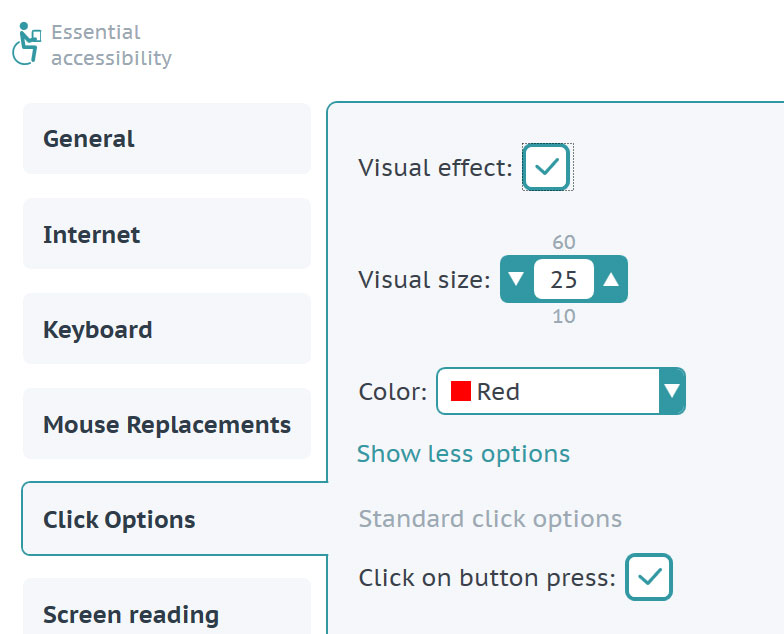
In this screen, you can also adjust the Visual size of the “click circle” as well as its Color.
You can also use the Mouse Properties control panel in Windows to make the mouse pointer easier to see.
For more information, refer to Windows help.
Changing text size
You can change the size of text on many web pages using the text size controls at the top of the eSSENTIAL Accessibility™ window.
Using these controls does not affect the size of images. If you want to increase the size of everything on a web page, refer to Zooming (screen magnification) below.


This group of images consists of two icons.
- The “T-” decreases the size of the text.
- The “T+” increases the size of the text.
You can magnify the text on a web page up to four times its original size.
Zooming (screen magnification)
You can change the size of everything on a screen (text, images, videos and so forth) by using the screen magnification icons in the top of the eSSENTIAL Accessibility™ window.
To increase the size of text and leave everything else at its original size, refer to Changing text size on page 29.


This group of images consists of two icons.
- The “-” magnifying glass everything on the page smaller.
- The “+” magnifying makes everything on the page larger.
Hearing web page text read aloud
You can have eSSENTIAL Accessibility™ read aloud the text on a web page. It can read aloud any text, button captions, website texts, links, tags, and other elements that contain text that isn’t embedded in graphics.
Turning on text-to-speech
Before you use the text-to-speech feature, ensure:
- your computer is equipped with speakers.
- the speakers are on.
- speaker volume is at an adequate level.
The quality of the voice you hear depends on the quality of your computer’s audio components.
To use text-to-speech, follow these steps:
-
Click the Settings icon.
The Settings screen appears.
-
In the Settings screen, click Screen Reading in the list on the left side of the screen, and finally, the Enable text to speech check box.
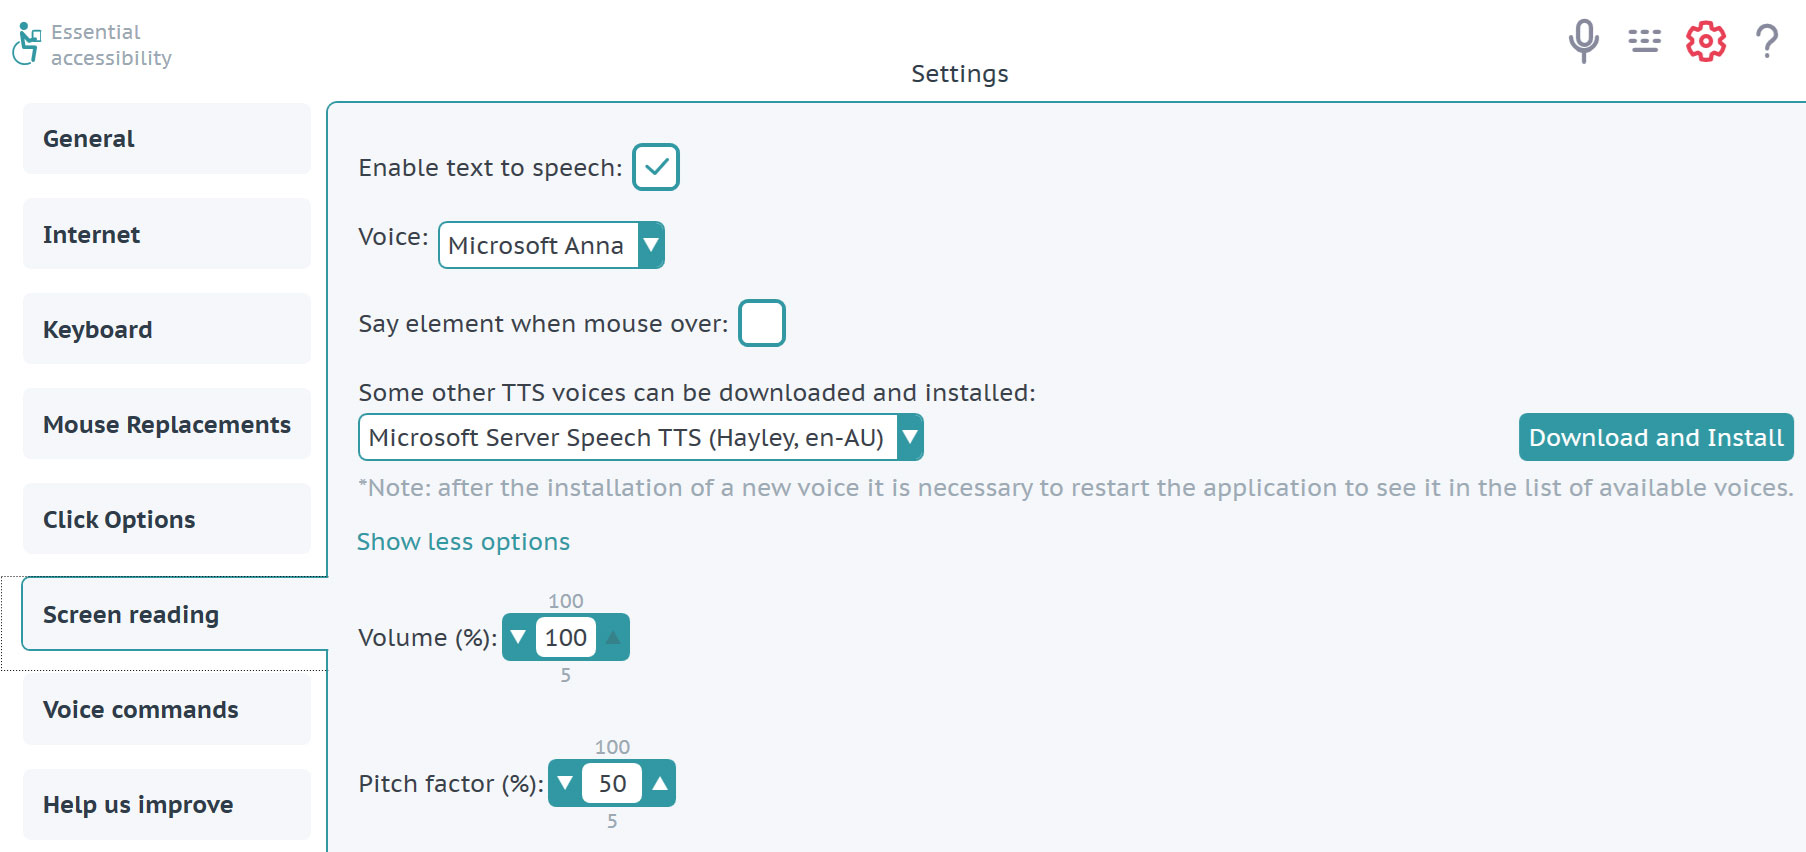
Note: When you select this text box, a series of icons appears at the top of the eSSENTIAL Accessibility™ window. Deselecting the text box makes these icons disappear.

In this screen, you can also set:
- the type of Voice you want to hear
- the default Volume (%) of that voice. Your computer may include volume controls on the keyboard and on the speakers that you can also adjust.
- the Pitch factor (%) (i.e. speed) at which that voice is spoken.
- Whether eSSENTIAL Accessibility™ says the names of elements (things on a web page that respond to mouse clicks) on web pages when you move a mouse pointer over them by selecting the Say element when mouse over check box.
Hearing all web page text read aloud
To hear all text on a web page read aloud, click the Read Page icon.

eSSENTIAL Accessibility™ reads until the end of the page or until you click the Stop Reading icon.

If there is no text on a page (or no text that isn’t embedded in a graphic), eSSENTIAL Accessibility™ tells you.


Hearing all web page links read aloud
To hear all links on a web page read aloud, click the Read Links icon.

eSSENTIAL Accessibility™ reads until the end of the page or until you click the Stop Reading icon.

If there is no text on a page (or no text that isn’t embedded in a graphic), eSSENTIAL Accessibility™ tells you.

Convenience features
eSSENTIAL Accessibility™ offers a number of features common to all web browsers.
Address bar
You can type the uniform resource locator (url), more commonly known as a website’s address, in the address bar. You can find the address bar near the top of the window, immediately below the toolbar.
In the following image, the address bar reads
http://www.essentialaccessibility.com/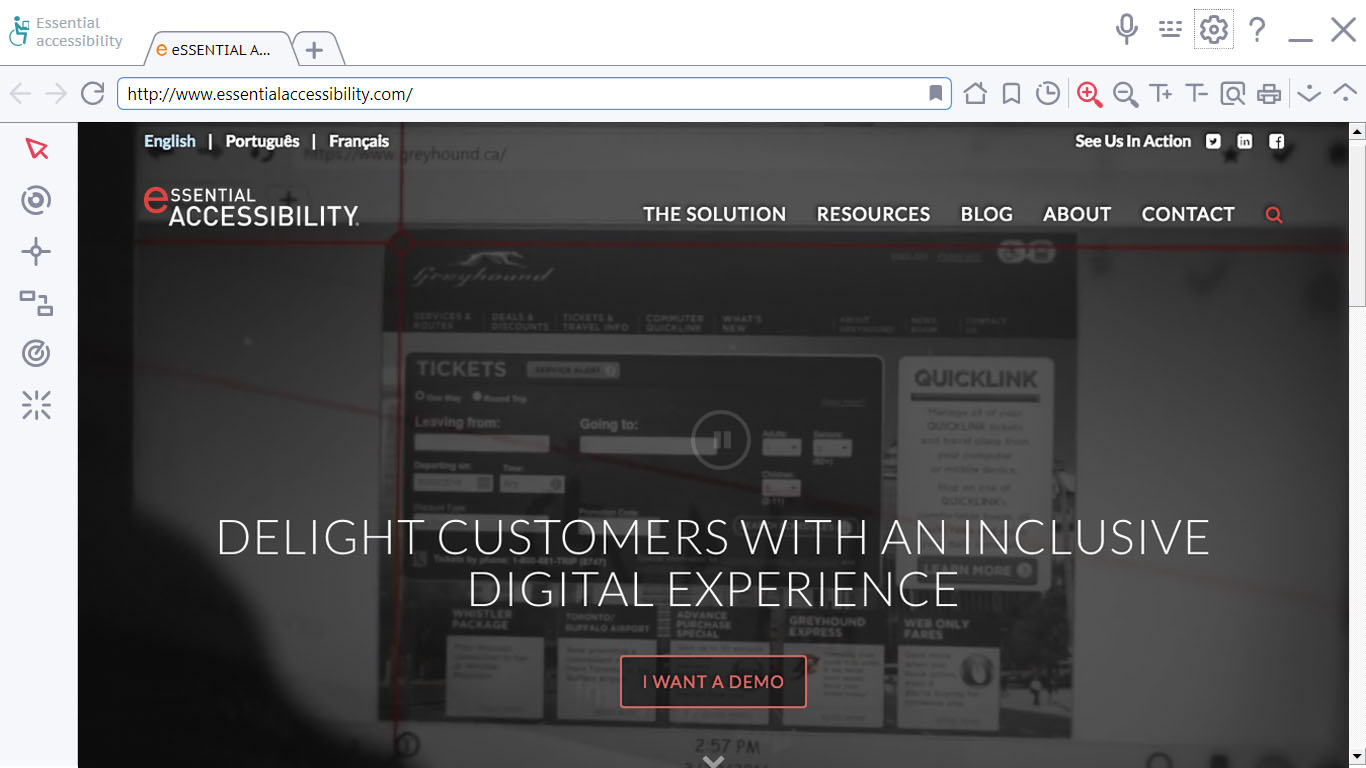
Browsing backwards and forwards
You can visit several web pages before you realize you want to return to a page that you had visited earlier. To return to that previously visited page, click the Browse backward arrow icon.
If you have only visited one page, this arrow is gray instead of black and clicking it won’t cause anything to happen.
You can also move “forward” through the sequence of pages you have visited by clicking the Browse forward arrow icon.
If you haven’t yet browsed backward, this arrow is gray instead of black and clicking it won’t cause anything to happen.