Tagging Complex Tables
![]() May 2, 2017
May 2, 2017

Author: Level Access
Complex Tables are to be avoided at all cost, as I stated in yesterday’s post, The Trouble with Tables: A Brief Introduction. The reason is that they will create 3 to 6 hours of work apiece for authors, developers, or remediators. I’ve spent a considerable amount of time searching my flush of problematic PDFs, looking for complex tables to use as an example, such as the following:
This sure looks like a complex table, and it is — but only due to the author’s desire to attach two separate tables together. A Section 508 remediator might send this back to the author and ask her to separate these tables in Word, making them two simple tables. The author might reply that having these tables attached is essential to the learning, that the reader must have a ready comparison of statistics on each row between CS Only and All Disciplines. Whether or not the author or the Section 508 department would prevail in this case would be a supervisory decision — and staff time expended would be a major part of that decision.
If the supervisory decision is that this table must be published as is, someone will have to make it accessible. It’s very likely that someone is you — which is why you’re reading this post. We are assuming that you already know that Complex Tables need IDs and data that relates to those IDs. This post is about how to do all that.
Where to Begin
I will be using sample Complex Tables in Word that I’ve created for the benefit of our screen reader users who can actually navigate the tables rather than deal with images and alt text. Here is our sample Complex Table from the previous post:
| HEADER 1 | **HEADER 2 | **HEADER 3 | HEADER 4 | **HEADER 5 | **HEADER 6 | HEADER 7 |
|---|---|---|---|---|---|---|
| **Sub header | **Sub header 2 | **Sub header 3 | **Sub header 4 | |||
| Data 1 | *Data 2 | *Data 3 | Data 4 | *Data 5 | *Data 6 | Data 7 |
| Data 8 | *Data 9 | *Data 10 | Data 11 | *Data 12 | *Data 13 | Data 14 |
| Data 15 | *Data 16 | *Data 17 | Data 18 | *Data 19 | *Data 20 | Data 21 |
| Data 22 | *Data 23 | *Data 24 | Data 25 | *Data 26 | *Data 27 | Data 28 |
Which Cells Need IDs?
It’s important to answer this because Complex Tables are frequently submitted with an ID assigned to every cell in the table. This especially happens in HTML where the whole output process has been automated, but it still happens with PDFs once in a while. Only nested header cells — the ones that make this a complex table — are given IDs. They are highlighted above and marked with double asterisks. Headers one, four, and seven are not nested and so not given IDs.
What about the Data Cells?
We receive any number of incompletely coded complex tables. The most common occurrence is when IDs are given to header cells but nothing is done with data cells. Let’s review what complex tables need to be coded in compliance with Section 508:
- Header cells must be scoped — in effect, they must tell the screen reader whether the data they refer to is in a column or in a row.
- Nested headers — headers and subheaders that are their direct children, must each have unique IDs. As in webpages, IDs must be unique within the document.
- Data cells that are children of the nested headers must have code that identifies which headers are associated with them, so that the screen reader will read the nested headers in descending order and then read the data cell contents every time a new cell is focused.
How Are These Items Coded?
There are two methods within Acrobat for coding these cells:
- Using the Table Editor. This is fairly easy to do, graphic, and intuitive. You will also find, especially in older editions of Acrobat, that it doesn’t work all the time. The Table Editor works fine for declaring headers, and most IDs. It does less well with associating Data cells with headers.
- Using the Attribute Object Editor. This lets you edit the Acrobat document at the code level. As I described in my blog on Role Mapping, Acrobat creates documents that can cross platforms easily by creating what are called dictionaries in a kind of Postscript code format. The Attribute Object Editor lets you change the attributes of each cell at the Dictionary level. It takes some getting used to, but it is actually what you use to check up on the work you’ve done with the Table Editor.
Let’s Start with the Table Editor and the Header Cells
Here is a screenshot from Acrobat where we are going through step one of the process. When this table was exported from Word, the table headers did not export with it so these must be tagged as headers. While we’re at it, we can enter the other relevant data as well.
- Ensure that the document has a basic set of table tags.
- Open up the Touch Up Reading Order tool. You should see a graphic X over the table that indicates that it has been recognized as a table. If you cannot use the Table Editor, it means that the table has a flawed structure and will need to be fixed.
- Open up the Table Editor.
- For each header, right click on the cell and choose “Table Cell Properties”
- Make sure that the “Header Cell” radio button is checked. In the Scope drop-down, choose either Row or Column. If the header spans rows or columns, enter how many of each. If this is a nested header — meaning that there are two levels of headers, enter a unique ID in the ID field. Click OK and exit the dialog. Check in the tag tree to make sure that the tags have changed.
- When you are finished, all of header cells should be tagged as header cells. Header cells 2, 3, 5, and 6 in our example table should have IDs as well. All of the sub header cells should have IDs. All header cells should be scoped. It is most helpful if the header IDs are related to the cell contents — it will be much easier to keep track of when doing the data cells.
Now We Move to the Data Cells
| HEADER 1 | **HEADER 2 | **HEADER 3 | HEADER 4 | **HEADER 5 | **HEADER 6 | HEADER 7 |
|---|---|---|---|---|---|---|
| **Sub header | **Sub header 2 | **Sub header 3 | **Sub header 4 | |||
| Data 1 | *Data 2 | *Data 3 | Data 4 | *Data 5 | *Data 6 | Data 7 |
| Data 8 | *Data 9 | *Data 10 | Data 11 | *Data 12 | *Data 13 | Data 14 |
| Data 15 | *Data 16 | *Data 17 | Data 18 | *Data 19 | *Data 20 | Data 21 |
| Data 22 | *Data 23 | *Data 24 | Data 25 | *Data 26 | *Data 27 | Data 28 |
The data cells that need to be coded correctly are colored blue or have a single asterisk.
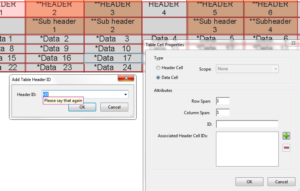
Here, I have selected the Data 17 cell and right clicked on it. In the dialog, only the Data Cell radio button is clicked. Notice that there is a + button to the right of an empty field that says Associated Header Cell IDs.
- Click or activate that Plus button. The Add Table Header ID dialog box pops up.
- There will be a value in the dialog box but it’s not necessarily the value you want. Click the drop-down box and it will show every available ID. For the Data 17 cell, you’re going to want to choose H3 because that’s the ID of the parent header. Once you’ve selected that, click OK.
- Activate the Plus button again, and choose the ID for the subheader SH 2. Click OK again.
The Table Cell Properties dialog box should look like this:
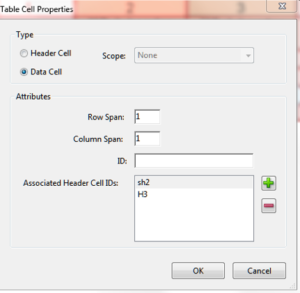
These steps will have to be repeated for every data cell that is a child of the nested headers. The cells don’t have to be updated in any particular order, though it is helpful just for keeping track–there are complex tables that have dozens and dozens of data rows. If there are header cells along the left side of the table, include them in the order by giving them IDs as well and by activating them last. The reading order should read from bottom to top in the associated header cell IDs pane.
If there is a row of headers on the X axis, you can give the headers IDs and include them in the list. Be aware, however that screen readers vary in their ability to read row headers accurately.
Check Your Work
The best way to check your work in tagging a complex table is to test the table using a screen reader. What happens very often, however, is that when you check in this way you find there are gaps in the table, or that the screen reader is not reading the appropriate headers with every linked data cell, or is not reading headers at all in some cases. Yet, when you go back and check with the Table Editor, everything seems to be where it is supposed to be.
That is where the Attributes Object Editor comes into play. I have found that in tagging complex tables, two thirds of my time is involved in using this editor.
The Attribute Object Editor
To open the Attribute Object Editor, go to the tag tree:
- Right-click on the <TH> or <TD> cell that you want to check.
- Choose “Properties”
- The “Properties” pane will show you whether this is indeed registered as a header cell or a data cell. It will also show you if the correct Header ID is registered. To find out if the scoping is correct, however, you will have to go on to the next step.
- Choose Edit Attribute Objects.
- The following will appear:
- The good news is that the blue Attribute Objects bar has a plus in it. This means that the cell referenced here has had its attributes populated by the Table Editor. This doesn’t always happen. We’ll deal with that later. Open up all the + symbols — there might be several — to reveal the attributes list.
- This tells you that this header cell has been scoped for a column. To summarize:
- The Properties Pane will tell you whether an object is a header cell or a data cell, and whether or not it has an ID, and what that ID is.
- Choosing Edit Attribute Objects will tell you how and if the header is scoped.
- If you open the Edit Attribute Objects pane for a Data Cell, you will hopefully see the following:
- This will tell you that the work you have done with the Table Editor has worked — meaning that the attributes have been written in the basic code dictionary for this object.
- It is essential in a complex table to check the entire network of linked cells — both headers and data cells — using the Attribute Objects Editor.
You May Have To Start from Scratch
It often happens that when you create the relationships between the header cells and the data cells in the Table Editor, a sizable portion of the changes you made will not actually transfer to the underlying code. You will open the Edit Attribute Objects pane and find nothing there at all. This used to happen a lot in Acrobat IX, and somewhat less in Acrobat X and XI. If it does — and making a complex table accessible involves checking every dependent cell for this — the only thing you can do is populate the Attributes yourself. You’re going to start with an empty attributes pane that corresponds to the cell you are changing:
- Activate the New Items Button. Then activate the + sign.
- Underneath /Attribute Object 1 <<Dictionary>> you will see
/O /Layout - This has to be changed. What you’re seeing is the default attribute for an object. Focus the /O /Layout and note that now the Change Item button is available. Activate that button.
- The Change Value dialog will open. Enter “Table” and press OK. Congratulations: you have now told Acrobat that this cell’s attributes apply to a table. Now you need to define those attributes.
Adding New Attributes for a Header Cell
- Make sure you have performed steps 1 through 4 above
- Highlight /Attribute Object 1 <<Dictionary>>
- Activate the New Item button. The Add Key and Value dialog will appear
- In the Key field enter “Scope”
- In the Value field enter “column” or “row”
- Make sure that the Value Type drop-down says “Name”
- Activate OK. In the Properties pane, recheck that the cell is marked as a table header cell, and if it is part of a dependent series, that it has a valid ID.
Adding New Attributes for a Dependent Data Cell
- Make sure that you have performed the first steps 1 through 4 in the first paragraph.
- Highlight /Attribute Object 1 <<Dictionary>>
- Activate the New Item button. The Add Key and Value dialog will appear
- Move down to the Value Type drop-down first, and choose “Array”. This is because you are going to make an array of different headers that are linked to this data cell.
- In the Key field, enter “headers” and activate OK.
- You will now see in the Attributes pane /headers
[Array]. Highlight this, and activate New Item - In the Value field, enter a header ID that this data cell is related to exactly as it was defined for the header cells. It helps to make a list of the exact IDs you have created for the headers. IDs are case-sensitive.
- In the Value Type drop-down, choose “String”. Activate OK.
- Repeat this step until all the headers and sub headers that are related to this data cell are represented in the array in the Attributes pane. Make sure that the array order reflects how you would like these headers to be announced by the screen reader.
Summary
I hope this has been helpful in defining the steps needed to code complex tables in Acrobat. Remember—the first step in dealing with any complex table is to analyze the table to see if it can be altered to make it non-complex. A complex table is one in which there are two rows of headers that must be referenced to understand the relevance of dependent data cells. Both header IDs and data cell dependencies must be defined to make a complex table accessible.
Looking to advance your team’s knowledge of accessibility best practices? Learn more about our expert-led onsite workshops and our e-learning portal!
Share

Subscribe for updates